Monday, December 12, 2011

Mount Ext4 partitios in Windows


Ubuntu partitions are incompatible with Windows, we can not read and write to them  from widows. Ext4 partitions can be read  from windows if you install a simple utility in Windows.
 Download ext2fsd from

  
http://sourceforge.net/projects/ext2fsd/files/Ext2fsd/0.51/
 Find out  Ext2Fsd-0.51.exe from the above site and install it. The following screen shots are self explanatory.


Sunday, December 11, 2011

how to clone ubuntu installation

Here is a quick way to  build an exactly similar  ubuntu installation on another computer.

Run
$ dpkg --get-selections >my_pakages

on the machine that you want to clone. Install a clean copy of Ubuntu on the target machine. Copy the file my_packages to the target machine.
Run the following command on the target machine.
sudo dpkg --set-selections < ./package_names
sudo apt-get -u dselect-upgrade

 Done.

Saturday, November 26, 2011

SSH Login Without Password


For this you required to generate your own personal set of private/public pair. ssh-keygen is used to generate that key pair for you.
On the user’s home directory, on the localhost, type

[local-host]$ ssh-keygen -t dsa

This will ask you a passphrase. A passphrase is a sequence of words or other text used to control access to a computer system, program or data. A passphrase is similar to a password in usage, but is generally longer for added security. Once entered the passphrase you will be prompted to enter the same passphrase again for confirmation.
The private key was saved in .ssh/id_dsa and the public key .ssh/id_dsa.pub.
Now, copy the public key to the remote machine

[local-host]$ ssh-copy-id -i ~/.ssh/id_dsa.pub user@remotehost

or if you don’t have ssh-copy-id script installed use
 
[local-host]$ cat ~/.ssh/id_dsa.pub | ssh user@remotehost "cat - >> ~/.ssh/authorized_keys"

Now on the localhost machine, on GNOME select System > Preferences > Sessions.
Select Startup Programs and add a new entry with this command.
eval `ssh-agent`
ssh-agent is a program that used together with OpenSSH or similar ssh programs provides a secure way of storing the passphrase of the private key.
Open terminal and run ssh-add without any arguments, it will ask your passphrase once.
ssh-add adds identities to the authentication agent, ssh-agent.

[local-host]$ ssh-add

Enter passphrase for /home/vinod/.ssh/id_dsa:
Identity added: /home/you/.ssh/id_dsa (/home/you/.ssh/id_dsa)
That’s it, now login to remote server it will not ask any password or passphrase.
NB: No one else must see the content of .ssh/id_dsa, as it is used to decrypt all correspondence encrypted with the public key.

Friday, July 8, 2011

Childsplay for kids

 Childsplay is a collection of educational activities for young children and runs on Windows, OSX, and Linux. It can be used at home, kindergartens and pre-schools. Childsplay is a fun and save way to let young children use the computer and at the same time teach them a little math, letters of the alphabets, spelling, eye-hand coordination etc.

Childsplay is part of the schoolsplay.org project

Childsplay includes the following games:
 * Numbers - Put the correct operator between two numbers.
 * SoundNpic - A toy for young children with pictures and sounds.
 * Packid - A pac-man game, try to catch the letters.
 * Soundmemory - The classic memory game, with sounds.
 * Fallingletter - Type them before the reach the ground.
 * Findsound - Listen to a sound and find the image to which it belongs
 * Findsound2 - The same as findsound, now with numbers and letters.
 * Pong - The classic game, play alone or against another child.
 * Billiards - Try to shoot the balls into the hole.

Childsplay installation:
  On ubuntu  open a terminal and type

sudo apt-get install childsplay
After installation you can open childsplay from Applications > Education > Childsplay

Wednesday, June 29, 2011

How to recover deleted files in Ubuntu/Linux


When a file is deleted, only the pointer to the file is overwritten and the original file will still reside in the blocks of the storage device and will be kept there until it is overwritten by another file. In a sense, you can always write a file but you can never delete it. So if you have ever faced the dilemma of trying to recover a deleted file in Ubuntu then look no further. Linux offers a wide range of tools for recovering deleted files. These tools work by retrieving the pointer to the deleted files.
The chief among the recovery tools would be Scalpel. Scalpel is a platform independent command based tool which is small yet very powerful. You can install the latest version of Scalpel (version 2.0) by doing a simple
sudo apt-get install scalpel 
in the terminal.
After installation you need to go to the configuration file of scalpel which resides in
/etc/scalpel/scalpel.conf
Using an editor like gedit open the scalpel.conf file using the command.
sudo gedit /etc/scalpel/scalpel.conf
You will notice that that all the lines in the file are preceded by a comment (#) symbol. Remove the # symbol preceding the file you want to recover.
sudo scalpel "device name/Directoryname/file name" -o "output directory"
The output directory is the directory where you want to restore your deleted files. It should be empty before running the command, otherwise you will get an error. You can also input the deleted filename directly by using -i option.

Monday, May 30, 2011

Lubuntu Desktop on Natty

 If you don't like the default unity desktop , there are several alternative desktops available for Natty. Lubuntu from the LXDE project is one of my favorites.

install lubuntu in Ubuntu 11.04

Lubuntu is a faster, more lightweight and energy saving variant of Ubuntu based on LXDE desktop, the Lightweight X11 Desktop Environment.
  • Install Lubuntu in Ubuntu 11.04 by doing the following in Terminal.
sudo apt-get install lubuntu-desktop
  • Done. Lubuntu desktop will now be available within your Ubuntu GDM login window as a different session already.

Sunday, May 29, 2011

QR code on ubuntu

A QR Code (it stands for "Quick Response") is a mobile phone readable barcode.simply encode a URL into the QR Code and then point a mobile phone (or other camera-enabled mobile) at it. If the device has had QR Code decoding software installed on it, it will fire up its browser and go straight to that URL.

But it doesn't stop there - a QR Code can also contain a phone number, an SMS message  VCard data or just plain alphanumeric text, and the will respond by opening up the correct application to handle the encoded data appropriately courtesy of the FNC1 Application Identifiers that are embedded in the encoded data.

The technical specifications for a QR Code are set down in the ISO-18004 standard so they are the same all over the world, and the only significant variations from one QR code to another (apart from the data it contains) is the number of modules required to store the data.

To make things a bit more robust, the QR Code also contains its own error correction data, internal orientation calibration and self-alignment markers. In this way it doesn't matter whether the QR code is upside down or wrapped around a curved surface, the message will still get through.

You can easily generate QR Code under Ubuntu for this you need to install 'qrencode’ package. In Ubuntu, you can install qrencode using this command:
apt-get install qrencode
Go to terminal and type folloing command to generate QR code image:
qrencode -l L -v 1 -o unixlab.png "http://unixlab.blogspot.com"

Zorin Splash Manager

Zorin Splash Manager  is a cool application with which you can change the  theme  of Ubuntu desktop. The screen shot of the GUI is given below.

Install, change Plymouth Themes in Ubuntu

  Basically,   Zorin Splash Screen Manager is an application  made for Zorin OS project, a Linux distro based on Ubuntu. It offers the following features.
  •  You can install , remove and change the plymouth theme. Here are some additional screen shots on its usage.
Zorin Splash Screen Manager

Zorin Splash Screen Manager: Manage Plymouth Themes in Ubuntu
How  to install   Zorin Splash Screen Manager
 
     You can install the deb package  from the command line  or   you just double click of the deb package from nautilus ( this will launch gdeb-gtk)


Monday, May 16, 2011

Installing android on ubuntu

Here is a small tutorial on developing android apps on ubuntu platform.

 The article has step by step instructions and lots of screen shots.
http://ieffects.blogspot.com/2011/05/android-and-ubuntu-everything.html

Wednesday, May 11, 2011

Installing Ubuntu 11.04 in pendrive persistently : time for pendrive OS

What about the idea of carrying your operating system where you go? I am not talking about bringing your laptop everywhere you go, instead use your pendrive to carry your linux distro. Not simply the live distro, you can carry your operating system with all your configurations,

Sunday, March 20, 2011

Wall paper slide show on Kubuntu


Right Click on the Kubuntu Desktop and   Select "Desktop Activity Settings" Change the "Type" dropdown to read "Slideshow".
Select the Image folders you want to scan, and the time delay you want

How to block flash videos using Squid proxy Server

    Some times network admins want to block flash videos from  being played on the network. You can configure  Squid proxy server to do the same if we block the appropriate MIME type.
The MIME Type reply is generally set correctly so browsers are able to pass the reply to the correct module (image, text, html, flash, music, mpeg, etc.)

The MIME type for flash videos  is "video/x-flv". Creating an ACL to block this is easy.

First, create an ACL which matches the MIME type in question:
acl deny_rep_mime_flashvideo rep_mime_type video/x-flv
Then create a HTTP Reply ACL which denies any replies with that MIME type:
http_reply_access deny deny_rep_mime_flashvideo

If the content is blocked the following similar line will be seen in access.log:

1282485682.146    903 127.0.0.1 TCP_DENIED_REPLY/403 3143 GET http://tc.v15.cache3.c.youtube.com/videoplayback? - DIRECT/208.117.252.163 text/html

Saturday, March 19, 2011

Converting IMG files to ISO images

Some time you will find CD images with .img extentions. Most probably such images are created by clonecd, a windows program.

IMG files are raw-data copies of optical media and are primarily used  to  store  CDs with  odd  properties,such as sectors which need to have read errors when read. Conversion to ISO format removes this  information,as ISO format does not support this.

You can manipulate  such images if you install ccd2iso package.
   sudo aptitude install ccd2iso

  You can  convert  img files to iso files as shown below.
    ccd2iso file.img file1.iso
 IMG  files almost always include a SUB file, which contains additional data for the disc format, and a CCD file, which is a plaintext configu-ration file describing the disc layout.ccd2iso does not make use of  these files


Friday, March 18, 2011

How to Autostart a program at log in ( Ubuntu )

 You can start up a program or script automatically when you login by creating a ling to  ~/.config/autostart 
For example, to start Firefox at log in , create a symbolic link.
 $ sudo ln -s /usr/bin/firefox ~/.config/autostart
  

Thursday, February 24, 2011

How to enable PHP in Apache per user directory configuration on Ubuntu 10.10

   If you want to  do web application development on Ubuntu systems,  enabling per user directory configuration on Apache web server is a good idea.  You can  make a  directory on your home folder visible  to the web server and  view it via web browser.
   Let us start with  apache installation

$ sudo apt-get install apache2


  By default apache serves pages from  /var/www/
If you  invoke http://127.0.0.1 on a browser, you can view web pages stored in
/var/www . However , if you want to put a new  html page at /var/www , you need  root access.   You can make a directory in your home folder visible to the server and access this directory via http://127.0.0.1/~username.  ( Substitute username with your actual login name.) . For achieving this, do the following steps.
  
  $ sudo a2enmod userdir
        Enabling module userdir.
        Run '/etc/init.d/apache2 restart' to activate new configuration!


Now restart  apache
$ sudo /etc/init.d/apache2 restart


 Userdir   mod  will  make public_html  folder   in your home directory available on  web server.  You can create public_html   folder in your home folder and develop  your web applications.
    If you are developing  PHP applications , you have to enable php support  for per user directory configuration.
For enabling php,
sudo vi /etc/apache2/mods-available/php5.conf

Look for the lines that look like


and change them to look like:


 then restart apache.
sudo /etc/init.d/apache2 restart


Wednesday, February 16, 2011

System backup with TimeVault

Time vault is a GUI application that can assist  users in taking incremental back up.  Its functionality is similar  to Time/Machine available on Apple MACs

  TimeVault  makes automated  snapshots of (selected parts of) the file system. You can roll back to a previous version  of a file or directory, or just view it the way it was when the snapshot was taken. Snapshots are protected from accidental deletion or modification since they are read-only by default. The super-user can delete intermediate snapshots to save space, but files and directories that existed before or after the deletion will still be accessible

It's also integrates into Nautilus, so you can go the properties page for a snapshot'ed file (right-click in Nautilus and choose properties), and see a 'Previous Versions' tab with a calendar on it.

TimeVault Features include:
 * Automatically saves and recovers data
 * Actively monitors selected folders
 * Automated snapshots
 * Tight integration with Nautilus, the GNOME file manager
 * File-system agnostic
 * Highly configurable
 * Intuitive interface
 * Archive browser

TimeVault Installation and Configuration:
Download the .deb file from here, doubleclick on this file to install TimeVault.
After installing the .deb file, there are two steps required to complete installation:

You must configure TimeVault, the backend will start automatically but the notifier needs to be started: To get the notifier app to start in your systray whenever you log in you can add it to your startup programs in System > Preferences > Startup Applications, you should have an option to add a program click that, name it TimeVault and put:
/usr/bin/timevault-notifier
in the a terminal , you can put whatever you like in the comments box. After you have done this if you log out and back in again you should magically have the TimeVault notifier app sitting in your systray. Right click on it and go to preferences to configure TimeVault as you wish.

Using TimeVault:
There are three tabs: General, Include and Exclude.


General:
Enable Automated Snapshots: By default, TimeVault will not automatically take snapshots of your system. Checking this box will tell it to automatically take daily snapshots.

Show snapshot notifications: This switch toggles on and off whether snapshot notifications are to be shown or not.

Snapshot Root Directory: Where to store the snapshots. Ideally, you should pick a directory that is mounted onto another physical drive from the data you are backing up. This is so that, in the case of a hard-disk failure, the backups will remain intact (unless the drive containing the backups fails, in which case the current version of the data remains).

Make sure you change the settings under Advance to include your largest file, currently it is only set for 32mb. This is not large enough if you have videos as part of a back up. You may consider to back up to a network drive, in the case of total hard drive failure your data will be safe.

Include:
Backup paths are listed here. Every directory that you want snapshot should be added to this list.

Exclude:
Paths or patterns to exclude from the snapshots should be listed here.

When you have finished making the necessary changes click the save button and TimeVault should pop up a message saying. You have included new directories in the TimeVault. File signatures will now be computed. Click ok in this box and TimeVault should be active and will start watching your files.

Tuesday, February 15, 2011

Advanced IP subnet calculator sipcalc

      Sipcalc is an advanced console-based IP subnet calculator. It can take multiple forms of input (IPv4/IPv6/interface/hostname) and output a multitude of information about a given subnet.
 On ubuntu,  you can install it from  software center or from the command line.

If you want to calculate the netmask details of 123.123.123.123/28, here we go

$  sipcalc 123.123.123.123/28
-[ipv4 : 123.123.123.123/28] - 0

[CIDR]
Host address        - 123.123.123.123
Host address (decimal)    - 2071690107
Host address (hex)    - 7B7B7B7B
Network address        - 123.123.123.112
Network mask        - 255.255.255.240
Network mask (bits)    - 28
Network mask (hex)    - FFFFFFF0
Broadcast address    - 123.123.123.127
Cisco wildcard        - 0.0.0.15
Addresses in network    - 16
Network range        - 123.123.123.112 - 123.123.123.127
Usable range        - 123.123.123.113 - 123.123.123.126

Any net admin would love this gem.

You can use it on your existing interfaces too.
Here is the sample ipcalc output from my wlan interface

  # sipcalc -d -bcix -n 4 -e -r -t  wlan0


 [Classfull]
Host address        - 192.168.1.2
Host address (decimal)    - 3232235778
Host address (hex)    - C0A80102
Network address        - 192.168.1.0
Network class        - C
Network mask        - 255.255.255.0
Network mask (hex)    - FFFFFF00
Broadcast address    - 192.168.1.255

[CIDR]
Host address        - 192.168.1.2
Host address (decimal)    - 3232235778
Host address (hex)    - C0A80102
Network address        - 192.168.1.0
Network mask        - 255.255.255.0
Network mask (bits)    - 24
Network mask (hex)    - FFFFFF00
Broadcast address    - 192.168.1.255
Cisco wildcard        - 0.0.0.255
Addresses in network    - 256
Network range        - 192.168.1.0 - 192.168.1.255
Usable range        - 192.168.1.1 - 192.168.1.254
[Classfull bitmaps]
Network address        - 11000000.10101000.00000001.00000000
Network mask        - 11111111.11111111.11111111.00000000

[CIDR bitmaps]
Host address             - 11000000.10101000.00000001.00000010
Network address        - 11000000.10101000.00000001.00000000
Network mask              - 11111111.11111111.11111111.00000000
Broadcast address    - 11000000.10101000.00000001.11111111
Cisco wildcard        - 00000000.00000000.00000000.11111111
Network range        - 11000000.10101000.00000001.00000000 -
                                  11000000.10101000.00000001.11111111
Usable range        - 11000000.10101000.00000001.00000001 -
                                11000000.10101000.00000001.11111110

[Networks]
Network            - 192.168.1.0     - 192.168.1.255 (current)
Network            - 192.168.2.0     - 192.168.2.255
Network            - 192.168.3.0     - 192.168.3.255
Network            - 192.168.4.0     - 192.168.4.255


Reading E Books with FBReader

  If you are an avid E-book fan FBreader is a cool app for you. FBreader is available  on several platforms.Its main features are,

*  supports several open e-book formats: fb2, html, chm, plucker, palmdoc, ztxt, tcr (psion text), rtf, oeb, openreader, non-DRM'ed mobipocket, plain text, epub

*  reads directly from tar, zip, gzip, bzip2 archives (you can have several books in one archive)

*  supports a structured view of your e-book collection  automatically determines encodings

*  automatically generates a table of contents

*keeps the last open book and the last read positions for all open books between runs

*  automatic hyphenation (patterns for several languages are included)
*  searching and downloading books from www.feedbooks.com and www.litres.ru

* partial CSS support for epub files

  FBReader can be downloaded from its website for several platforms. Some of  the supported platforms include
       

  • Linux

  • Windowa

  • SmartQ 5/7 MID.

  • Nokia 770/N800/N810) Internet Tablet.

  • Sharp Zaurus with Qtopia-based ROindoiM (e.g., original Sharp, Cacko) installed.

  • Sharp Zaurus with pdaXrom installed.

  • Sharp Zaurus with OpenZaurus installed.

  • Siemens Simpad with OpenSimpad 0.9.0.

  • Archos PMA430.

  • PepperPad.

  • Motorola A1200 smartphone.

  • Google Android.


  •  
        FBReader   can be installed on  ubuntu from softeware center or from the command line.
    $ su apt-get install fbreader

     Here are some screen shots of FBReader

    Monday, February 7, 2011

    Monitoring performance with time


           The time command is an excellent  tool  for analyzing the performance of a shell script or command. Simply type time followed by the command that you wish to time. Three results are printed when the program or script finishes executing: the actual length of time (real-world time spent on the program), the total time spent in the program, and the total time spent on CPU overhead. The first figure is perhaps the most useful, but the third figure will tell you how busy your CPU is.

    Let us create a small shell script. Type in the following  lines to a text file named myscript.sh

     #!/bin/bash
     
       echo "Welcome to Unixlab "
     
           
    Save the file and make it executable.

     $ chmod u+x  myscript.sh

    Now run it  using time  
     
    $ time myscript.sh
    real 0m0.008s
    user 0m0.004s
    sys 0m0.000s
    
    My machine is too fast to show any perceptible time.
    Now try to expand the myscript.sh  by adding  a for loop as below 
     
     #!/bin/bash
    for i in 1 2 3 4 5 
    do
       echo "Welcome to Unixlab "
    done
     
     
    Run it 
    $ time myscript.sh
     Welcome to Unixlab 
    Welcome to Unixlab 
    Welcome to Unixlab 
    Welcome to Unixlab 
    Welcome to Unixlab 
    
    real 0m0.008s
    user 0m0.004s
    sys 0m0.004s
    
    Still the real time is shown as 0.00.  Let us build a loop that takes a long
    time to finish and see the difference.
     #!/bin/bash
    x=1
    while [ $x -le 100 ]
    do
      echo "Welcome to Unixlab"
      x=$(( $x + 1 ))
    done
     
    Again run it.  I am getting the following  timings.
     
    real 0m0.016s
    user 0m0.012s
    sys 0m0.004s 
     
       Please read the time man page regarding accuracy of  results and  other 
    useful options.


    Sunday, February 6, 2011

    Searching filesystem from command line

     There are several commands available on the command line to locate files and folders on the file system. This article reviews three of them, viz whereis ,locate. find.

    1) whereis
    This command can search for  the binary, source, and manual page files for a comand


             $ whereis  whereis
                whereis: /usr/bin/whereis /usr/share/man/man1/whereis.1.gz

    2) locate:   locate uses a database created by an updatedb to efficiently locate files. Works great, assuming your database is updated often enough to be reasonable upto date. Most boxes using locate have the updatedb occuring in cron.  On my ubuntu box, I got a long list of files when I tried to locate  command.   RTFM locate


    $locate locate
    /etc/alternatives/locate
    /etc/alternatives/locate.1.gz
    /etc/beagle/blocate.conf
    /etc/cron.daily/mlocate
    /usr/bin/blocate
    /usr/bin/locate
    /usr/bin/mlocate

    3)  find:      find is perhaps one of the most powerful commands there is.   However, find is slow compared to locate as it  recursively search the paths supplied to  it. 


        The syntax of find is specified like this.      
     
    find path-list expression
     
    It may look rather cryptic. 
    Even though the man page lists only three  parts for the command as above, 
    for simplicity  we can imagine  that  find  syntax  is havng  four fields.               
                      
    1 2 3 4
    find starting point find which files action on result
     
    You can formulate your find command based on the above table. For example,
      if you want to find all  avi files in a folder named movies  

    1 2 3 4
    find  movies -name "*.avi"  -print
      
          $find  movies   -name "*.avi"  -print
     
    Here are some examples you can try
     

    a) to find all directories on the system whose permissions of 777

         $   find / \( -type d -a -perm -777 \) -print

    b) find all core files in home directories and remove them

         $    find /home -name core -exec rm {} \;
           mand.


    c) find all files owned by a particular user no matter whose home directory they are in:


        $  find /home -user -print

    d) find all files that have been modified (or had their modification time changed) in the last 30 days:

           $ find / -mtime -30 -print

    e) find all tmp files older than 30 days and remove:

          $ find /dirpath \( -name \*.tmp -a -mtime +30 \) -exec rm {} \;


    The man page of find has several other option that you can try.


    Saturday, February 5, 2011

    Watch your BIOS settings with dmdeicode and biosdecode

        The Desktop Management Interface (DMI) generates a standard framework  for managing and tracking components in a desktop, notebook or server components , by abstracting these components from the software that manages them. Modern mother boards are compatible with this standard. For a lay user it means that the BIOS settings can be watched from your OS. DMI standards are published by Distributed Management Task Force (DMTF) into desktop-management standards. They also provide a related standard named
     SMBIOS (System Management BIOS ).

      On linux systems , you can watch various system parameters using dmidecode command. You  have to be superuser to display dmi information.

      #dmidecode

        As you run it, dmidecode will try to locate the DMI table.  It will print a long list of information. A sample entry is shown below.

      Base Board Information
        Manufacturer: Intel Corporation
        Product Name: DG35EC
        Version: AAE29266-205
        Serial Number: BTEC8270055Y
        Asset Tag: Base Board Asset Tag
        Features:
            Board is a hosting board
            Board is replaceable
        Location In Chassis: Base Board Chassis Location
        Chassis Handle: 0x0007
        Type: Unknown
        Contained Object Handles: 0


    If you look closely , each record has 


           · A handle. This is a unique identifier, which allows records to reference each other. For example, processor records usually reference cache mem‐
             ory records using their handles.

           · A type. The SMBIOS specification defines different types of elements a computer can be made of. In this example, the type is 2, which means that
             the record contains "Base Board Information".

           · A  size.  Each  record  has  a 4-byte header (2 for the handle, 1 for the type, 1 for the size), the rest is used by the record data. This value
             doesn’t take text strings into account (these are placed at the end of the record), so the actual length of the record may  be  (and  is  often)
             greater than the displayed value.

           · Decoded values. The information presented of course depends on the type of record. Here, we learn about the board’s manufacturer, model, version
             and serial number.

      There is also a related command named biosdecode which prints  a shorter description. On my desktop , biosdecode provided

    # biosdecode
    ACPI 1.0 present.
        OEM Identifier: INTEL
        RSD Table 32-bit Address: 0x7F6FD038
    PNP BIOS 1.0 present.
        Event Notification: Not Supported
        Real Mode 16-bit Code Address: F000:AF46
        Real Mode 16-bit Data Address: 0040:0000
        16-bit Protected Mode Code Address: 0x000FAF51
        16-bit Protected Mode Data Address: 0x00000400
        OEM Device Identifier: SST2400
    SMBIOS 2.4 present.
        Structure Table Length: 1551 bytes
        Structure Table Address: 0x000E33F0
        Number Of Structures: 33
        Maximum Structure Size: 152 bytes

    Friday, February 4, 2011

    What is your favorite command on terminal ?

      I  am an avid terminal user and try to work directly on $ prompt as far as possible.  If you are a command line geek, the following command can display  the 10 commands that you use most often.

      $  history | awk '{print $2}' | sort | uniq -c | sort -rn | head -10

    Here is my output.

       73 sudo
         56 ls
         46 cd
         23 ifconfig
         20 dmesg
         11 ps
         10 ssh
         10 lsusb
          9 vi
          8 wget
     
     If you like this , please post your  list of commands.

    Thursday, February 3, 2011

    Manipulate images with ImageMagick


    Images can be easily manipulated from terminal with image magic package.  On ubuntu systems , imagemagick  can be installed as below.


     sudo apt-get install imagemagick  

    Here are some tricks that I   use with imagemagick.

       1)  Create a thumb nail.

                $ convert screenshot.png   -resize 64x64  resized_sceenshot.png

              if you want to preserve the aspect ratio   put a !  after the size.


                $ convert screenshot.png   -resize 64x64\!  resized_sceenshot.png


          2) Add a border to an image 

                 $ convert screenshot.png  -bordercolor SkyBlue    -border 10x10   screenshot_border.png      

        You can try different  colors and border size
         
         3)  Convert an image to black & white

              $ convert -type Grayscale screenshot.png  screenshot_bw.png

         4)  Add a label over the image.

               $ convert screenshot.png -gravity south  -stroke '#000C' -strokewidth 2 -annotate 0 'http://unixlab.blogspot.com'  -stroke none  -fill white  -annotate 0 'http://unixlab.blogspot.com'    screenshot_labelled.png
     
           5)  Generate labels from text
     
          $ convert -background lightblue -fill blue \
              -font Candice -pointsize 72 label:Unixlab \
              label.gif

    Imagemagick offers lot of other possibilities . See  this site  for more examples. 


    Wednesday, February 2, 2011

    Head and Tail Commands

     
    Today we will discuss two commands that we be very helpful when working with large files based on text.   These are the commands head and tail. 
    Sometimes we have to open text files with a considerable size when in fact we see a few lines. 
    For example, a case would be to check a log or an XML file. For example, a case Would Be to check a log or an XML file.
     
    The head command displays only the first lines of the file. By default show the first 10 lines  We use it like this: We use it like this:
    head file.txt
    Or want to see that many lines, 15 in this example: 
    head -15 file.txt
    To perform the opposite action there is the tail command. What makes the tail is to show the last lines of a file. 
     It is ideal for example to see the latest changes file in a log. By default, like head, display 10 lines:  tail file.txt
    If you wish to view the last 15 lines:  tail -15 file.txt
     Combined with the grep command (to find words in files) head and tail are a great team. 

    How to eject a stuck CD/DVD

      Some times  CD/DVD drives get stuck and will not eject even if  you press the eject button on the front panel.  The is especially true when any application that was  using the CD drive has gone astray.  You can try the following  steps to get out of the situation.

       Open a terminal  and become  root. 

      $ sudo  su
      #

      Try eject  command.

        # eject

      If some application of  is using cdrom you will get a message like

     
          umount: /media/cdrom: device is busy

     To eject the CD you may have to stop the application.  First,  let us find out who  is using the CD drive.

         #fuser  /media/cdrom
             /media/cdrom:         5929c  6018c  6020c
     
     You can kill all processes  accessing  using /media/cdrom
        
            # fuser -km /media/cdrom 
     
     Then try
            #eject 


    Monday, January 31, 2011

    How to spoof MAC id

    Here we go, assuming you want to change the MAC id for eth0.

    sudo ifconfig eth0 down 
    sudo ifconfig eth0 hw ether 00:00:00:00:00:00      (choose your mac here)
    sudo ifconfig eth0 up


    Sunday, January 30, 2011

    Alternate Characters from Keyboard

    Engineers often need greek character while working with various programs . You can set up a second keyboard layout to switch between  normal english and greek characters. 

    Here's how:
    System -> Preferences -> Keyboard, then select Layouts Tab.

    Click [Add] -> Country=Greece, Variants=Greece

    You will see a diagram showing the new character set. Click [Add] then [Close].

    On the main panel (near the date?) you should see an icon showing the current keyboard layout. Click this to change layouts then υοθ σηοθλδ βε αβλε το τυπε ιν γρεεκ.

    You can also change your regular keyboard to use say "USA International (AltGr dead keys)". AltGr=Alternate Graphics=[Right Alt]. Some keys have 4 characters. Access the extra characters by pressing and holding the [Right Alt], then you can type þ & §.

    How to play DVD Movies in Ubuntu Linux 10.10


      Install the libdvdread4 package (no need to add third party repositories) via Synaptic or command line:

    $ sudo apt-get install libdvdread4

    Run the following command 


    $ sudo /usr/share/doc/libdvdread4/install-css.sh
     
    Another Way

    Saturday, January 29, 2011

    Text Watermarking in linux

    The traditional watermarking relies on embedding some information in a binary file (such a proprietary format doc - Adobe PDF, MS Word or multimedia files to identify the origin of a particular copy. Watermarking can be combined with steganography to hide this data from a casual viewer.

    Snowdrop is intended to bring (relatively) invisible and modification-proof watermarking to a new realm of "source material" - written word and computer source codes. The information is not being embedded in the least significant portions of some binary output, as it would be with a traditional low-level steganography, but into the source itself.

    Snowdrop provides reliable, difficult to remove stenographic watermarking of text documents (internal memos, draft research papers, advisories and other writing) and C sources (limited distribution software, licensed software, or freely available code) so that:

      * leaks can be identified if the data goes public.
      * Original source can be determined and demonstrated if part of the document is claimed by somebody else, copied without permission, etc ...

    Snowdrop Installation:
    Open terminal fromApplications -> Accessories  -> Terminal, and type following command

    sudo apt-get install snowdrop
    Using Snowdrop:
    Snowdrop is a command line tool, the simple way to apply watermark to your source code is by using command ...
    sd-c -i input.c output.c "secured"

    Now, to extract or compare the watermark, use the following command ..
    sd-c -e input.c output.c

    Convert bin-cue images to iso in GNU / Linux

     
      Install the following  files via apt or software centre.
     
         sudo apt-get install bchunk sudo apt-get install bchunk
     

    To convert  to open a terminal and just  type
     
    bchunk  my_binfile.bin my_cuefile.cue   my_iso_image.iso 

    and within seconds you'll have your iso image .... Enjoy

    Friday, January 28, 2011

    Graphical IP Blocker


    This article describes how to block lists with a graphical front-end called IPblock. No knowledge of networking, firewalls or command-line configuration are needed. Due to the way IPblock works it doesn't change the behavior of existing firewalls which makes it compatible [1] with other firewall applications like ufw, shorewall or fireHOL. This howto is intended for Beginners and was tested on Ubuntu Feisty, Gutsy, Hardy, Intrepid, Jaunty and Karmic (32-bit and 64-bit).

    Installation
    Add the iplist repository to your sources.list. Make sure to use the correct sources.list that corresponds to your current distribution:
    • Ubuntu 10.10 "Maverick Meerkat":
      Code:
      sudo wget http://iplist.sf.net/sources.list.d/maverick.list -O /etc/apt/sources.list.d/iplist.list
    • Ubuntu 10.04 LTS "Lucid Lynx":
      Code:
      sudo wget http://iplist.sf.net/sources.list.d/lucid.list -O /etc/apt/sources.list.d/iplist.list
    • Ubuntu 9.10 "Karmic Koala":
      Code:
      sudo wget http://iplist.sf.net/sources.list.d/karmic.list -O /etc/apt/sources.list.d/iplist.list
    • Ubuntu 9.04 "Jaunty Jackalope":
      Code:
      sudo wget http://iplist.sf.net/sources.list.d/jaunty.list -O /etc/apt/sources.list.d/iplist.list
    • Ubuntu 8.10 "Intrepid Ibex":
      Code:
      sudo wget http://iplist.sf.net/sources.list.d/intrepid.list -O /etc/apt/sources.list.d/iplist.list
    • Ubuntu 8.04 "Hardy Heron":
      Code:
      sudo wget http://iplist.sf.net/sources.list.d/hardy.list -O /etc/apt/sources.list.d/iplist.list
    The key of the signed packages can be imported like this:
    Code:
    sudo apt-key adv --recv-keys --keyserver keyserver.ubuntu.com C6E3D905C8BCD56BB02E6E0B39456311108B243F
    There is also another way to import the key. You could save the pub key to a file and import it through System->Administration->Software Sources->Authentication->Import Key-file.

    After an update of the Software sources iplist can be installed with any package manager. E.g.:
    Code:
    sudo apt-get update
    sudo apt-get install iplist
    Note: If sun-java* is installed by gdebi it requires to open the terminal part of gdebi and accept sun's license agreement.
    Packages for Feisty and Gutsy can be found in the 0.19 release.

    After the installation IPblock can be found in Applications -> Internet -> IPblock.


    Lists

    The default choice for lists is similar to PeerGuardian.
    • level1.gz - Anti-P2P organizations and known government addresses
    • ads-trackers-and-bad-pr0n.gz - Advertising and data tracker servers
    • spyware.gz - Malicious spyware and adware servers
    • edu.gz - Educational institutions and universities
    • bogon.gz - Spoofed IP-addresses
    These lists are maintained by www.bluetack.co.uk (list descriptions). Custom p2p or dat lists can easily be added. Note that lists can optionally be compressed with gzip.
    The URL file /etc/ipblock.lists contains list descriptions.


    Settings

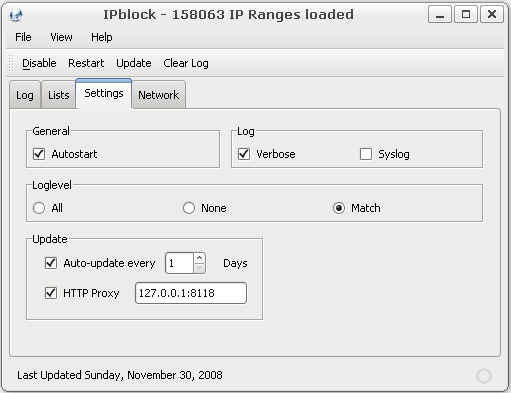
    All options can be configured in this and the network tab. Auto-updating lists is important and the default choice of 2 days is reasonable. Using out-of-date lists is not recommended.
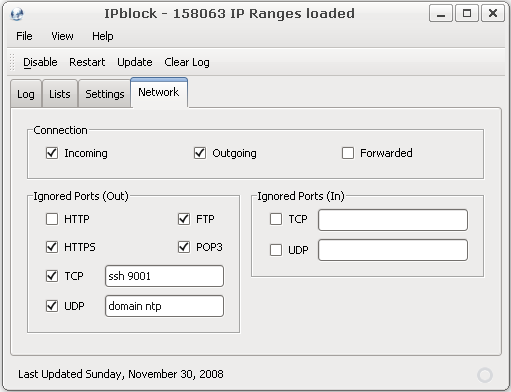
    To ignore outgoing network traffic like HTTP or EMAIL (pop3) use the ignored ports section. Note that http and dns (domain) is ignored by default. The connection-settings specify which type of connections should be filtered.


    Monday, January 17, 2011

    How launch byobu automatially in Gnome terminal

    Lanunch Gnome terminal. Click on Edit -profile preferences.. A window will pop up. click on Title and  Command.  Tick the button against  Run a custom command instead of my shell.  Set  byobu  as the  custom command.

    The screen shot explains it all.


    Saturday, January 15, 2011

    How to change default in GNOME Terminal to xterm


    Click on System ->prefferred Applications


     Change the terminal emulator to custom and  enter xterm  as the command to be executed.


    Thursday, January 13, 2011

    How to install Truecrypt on ubuntu 10.10

    TrueCrypt is Free open-source disk encryption software for Windows XP/2000/2003 and Linux. If you are paranoid about your data being stolen and misused, truecrypt is your friend.

    Some of the important features of truecrypt are as below.
    1)  It can create a virtual encrypted disk within a file and mounts it as a real disk.
    2) Truecrypt can  encrypt an entire hard disk partition or a device, such as USB flash drive.
    3) Encryption is automatic, real-time (on-the-fly) and transparent.

    True crypt provides two levels of plausible deniability, in case an adversary forces you to reveal the password:

    a) Hidden volume (steganography).
    b) No TrueCrypt volume can be identified (volumes cannot be distinguished from random data).

    True crypt can use the following encryption algorithms:
    AES-256,
    Blowfish (448-bit key),
    CAST5,
    Serpent,
    Triple DES,
    Twofish.

    You can download  truecryypt for your preferred operating systems from
     http://www.truecrypt.org/downloads. For linux  hosts 32bit and 64 bit code are available . Also you can find console only code.
    I down loaded truecrypt7.0a ( the latest stable version from
     http://www.truecrypt.org/download/truecrypt-7.0a-linux-x86.tar.gz

    The downloaded file may then be untarred and unziped using

     $ tar -xzvf  truecrypt-7.0a-linux-x86.tar.gz

    Now if you look in your directory a  file named  truecrypt-7.0a-setup-x86 will be present.  You can install truecrypt by executing  this file as follows.

    $ sh truecrypt-7.0a-setup-x86

      Now a window will pop up as shown below.


    You can  choose install  truecrypt. Another screen will follow asking you to agree to the licence. If you agree, the system will ask you the password for superuser access and will install true crypt in to /usr/bin/truecrypt
    You can start up truecrypt from a command prompt as below.

     $ truecrypt

      Truecrypt screen will pop up as  shown below.

     
    You can look at the documentation at  http://www.truecrypt.org/docs/  for using truecrypt .

    How to get back ctrl alt backspace in ubuntu

    Since Ubuntu 9.04, the Ctrl-Alt-Backspace key combination to force a restart of X is now disabled by default, to eliminate the problem of accidentally triggering the key combination. In addition, the Ctrl-Alt-Backspace option is now configured as an X keymap (XKB) option, replacing the X server “DontZap” option and allowing per-user configuration of this setting.
    As a result, enabling or disabling the Ctrl+Alt+Backspace shortcut can now be done easily from the desktop.
    Enabling Ctrl-Alt-Backspace for Ubuntu 10.04
    * Select “System”->”Preferences”->”Keyboard”
    * Select the “Layouts” tab and click on the “Layout Options” button.
    * Select “Key sequence to kill the X server” and enable “Control + Alt + Backspace”.
    Enabling Ctrl-Alt-Backspace for Kubuntu 10.04
    * Click on the Application launcher and select “System Settings”
    * Click on “Regional & Language”.
    * Select “Keyboard Layout”.
    * Click on “Enable keyboard layouts” (in the Layout tab).
    * Select the “Advanced” tab. Then select “Key sequence to kill the X server” and enable “Control + Alt + Backspace”.

    Wednesday, January 12, 2011

    Digital speech in Ubuntu 10.10 maverick

    You can make your ubuntu terminal speak to to using spd
    Open up a terminal window and type this command:
    $ spd-say test
    Your computer will then say “test”.
    If you  want to make your computer speak in complete sentences as below.
    $ spd-say “ hello how do you do ?" 

    You can even feed system variables into the spd-say command. For instance, to get spd-say to speak your current working directory:
    $ spd-say $PWD

    man spd-say for more details

    Tuesday, January 11, 2011

    How to reset mysql root password in Ubuntu /Debian linux

    I for got my mysql root password last week.  , you can reset your mysql root password.
    First You have to  Stop mysql server:
    #service mysqld stop
    Now Start mysql server in safe mode with Follwing Options:
    #mysqld_safe –user=mysql –skip-grant-tables –skip-networking &
    Now you have to Login to mysql server without password:
    #mysql -u root mysql
    You will get Mysql Prompt.
    Type ‘help;’ or ‘\h’ for help. Type ‘\c’ to clear the current input statement.
    mysql>
    Now the Time for Resetting  mysql root password:
    Run the following  commands very carefully  ( don’t miss semicolon  )
    mysql> UPDATE user SET Password=PASSWORD(‘newrootpassword’) WHERE User=’root’;
    mysql> flush privileges;
    mysql> exit

    5) Restart mysql server:
    #service mysqld restart
    6) Login to MySQL With the New Password:
    root@server ]# mysql -u root -p
    Enter password:
    Type ‘help;’ or ‘\h’ for help. Type ‘\c’ to clear the current input statement.
    mysql>