Tuesday, March 23, 2010

How to start web development with XAMPP

 If you are planning to learn web development using  LAMP environment , and find it difficult to set up various component required,  XAMPP  can come to your rescue.   In fact, XAMPP is a prebuilt package with following componets, Apache,MySQL, PHP and Perl.
 You can download the XAMPP package from Apache Friends website. The present release is available for a variety of operating systems.

Installation

   For installation on Ubuntu I downloaded the tar.gz archive from Apache Friends
 I decided to install xampp into /opt . Untar the downloaded file using the following command.
sudo tar -xzvf xampp-linux-1.7.3a.tar.gz -C /opt
Earlier,  the name of XAMPP project was LAMPP . Hence a folder named LAMPP will be created under /opt with all necessary files.

Start/Stop XAMPP
  You  can start XAMPP using the following command from a terminal

sudo /opt/lampp/lampp start
 Similarly you can stop xampp using

sudo /opt/lampp/lampp stop

Look for any error messages while running the commands.

Using XAMPP to write your web application
 
  Now open up a browser and browse http://127.0.0.1 The following screens will appear .


You can access phpmyadmin from the tools section and work with mysql.

Now you can create a folder named public_html in your home directory.

mkdir ~/public_html

Now you can link this folder to your apache document root as below.


sudo ln -s ~/public_html /opt/lampp/htdocs/$USER

 You can write your HTML/php code using any editor and save it under public_html folder in your home directory. You can test your code by browsing to http://127.0.0.1/yourusername. ( Replace yourusername with your actual user name).

Security issues
  It is not advisable to set up XAMPP to a machine directly connected to internet.   The XAMPP is designed as a beginners platform to learn LAMP. If you want to run a production system look else where for a secure installation of LAMP.

Sunday, March 14, 2010

How To Create A Tune with Linux Multimedia Studio

LMMS is a free cross-platform alternative to commercial programs like FL Studio®, which allow you to produce music with your computer. This includes the creation of melodies and beats, the synthesis and mixing of sounds, and arranging of samples. You can have fun with your MIDI-keyboard and much more; all in a user-friendly and modern interface.

  On ubuntu you can install

$ sudo apt-get install lmms

 It shows up as Application -> Sound and video-> Linux Multimedia Studio

 When you launch it , you get the following screen.


LMMS offers the  following features.

  • Song-Editor for composing songs
  • A Beat+Bassline-Editor for creating beats and basslines
  • An easy-to-use Piano-Roll for editing patterns and melodies
  • An FX mixer with 64 FX channels and arbitrary number of effects allow unlimited mixing possibilities
  • Many powerful instrument and effect-plugins out of the box
  • Full user-defined track-based automation and computer-controlled automation sources
  • Compatible with many standards such as SoundFont2, VST(i), LADSPA, GUS Patches, and MIDI
  • Import of MIDI and FLP (Fruityloops® Project) files
 
If you are looking for a good tutorial on LMMS see this video.


Friday, March 12, 2010

Play wormux on Ubuntu

 Wormix is a  clone of classic arcade game worm. It is under active development under a free licence. Recently, wormix project has released version 0.9.1 of this beautiful game. It is available for ubuntu on a PPA. You can try out wormix  installing it from PPA.

sudo add-apt-repository ppa:wormux/ppa sudo apt-add-ppa repository: wormux / ppa
 Then update the packages and install wormix.

       $sudo apt-get update & & sudo apt-get install wormux
  
  A demo of wormix can be seen on the following video.

Wednesday, March 10, 2010

Two front ends for Clamav

Clamav is the most popular free anti virus program for Linux environment.( Of course it scans for widows virus) However, clam is a command line utility and you need some skills for manipulating is properly. There are several graphical front ends for clam av which can make your life easy. The most popular among them are clamtk and Klamav.

Clamtk
Clakmtk uses Perl-tk  for GUI. It is available for several distributions. On ubuntu you can install it as

$ sudo apt-get install clamtk

On Karmic it showed up as virus scanner under Applications ->system tools.

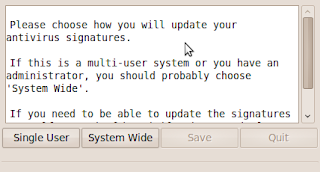
On launching it , the following screen pops up


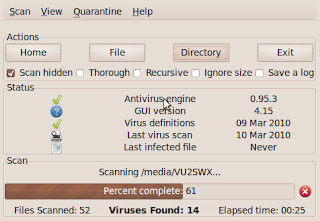
You can select for  single user settings or system wide settings and then click save. The main window of clamtk will pop . You can choose  either your home folder  , a file or a specific directory for scanning.


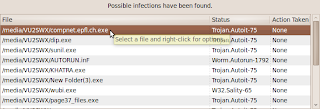
  When the scan is completed a list of detected  viruses will be shown. You can select individual  infections and right click on them to delete or quarantine.

  ( My usb stick had nearly 100 infections. I wanted to select them all for deletion  . How ever I could not find such  an option.)

Klamav
  Klamav is a KDE  based front end to clamav. You can install it with
$ sudo apt-get install klamav
It showed up as Applications->System tools ->klamav. On launching it, I

Tuesday, March 9, 2010

Nautilus Image Converter

Nautilus image converter is a nautilus  extension to mass resize or rotate images. if installed  an additional menu entry will appear when you  right  click the mouse inside nautilus. It is a convenient utility which can save you lot of effort.
For installation on ubuntu. do the following.


1.) Open a Terminal

2) Type the command

    $ sudo apt-get install nautilus-image-converter

3) Logout from the current session and login again.


 You can rotate or resize the image as seen in the screen shots below.

Resizie


Rotate

Sunday, March 7, 2010

Monitoring System Usage with systat

  An overburdened CPU is another obvious place to look for performance problems
on your system. Similarly io can be a bottleneck in proper system performance. You can watch various parameters if you install sysstat package.
On Ubuntu you can install with

  $ sudo apt-get install sysstat
 
 The sysstat package contains the following system performance tools:
  * sar - collects and reports system activity information;
  * iostat - reports CPU utilization and I/O statistics for disks;
  * mpstat - reports global and per-processor statistics;
  * pidstat - reports statistics for Linux tasks (processes);
  * sadf - displays data collected by sar in various formats.
 
       
See the screen shot of iostat command run from a terminal.
 Iostat can display cpu  usage statistics. The following command prints cpu stats every 3 sec

$ iostat -c 3 

To Print time stamp with CPU report you can use

$ iostat -c -t

 You can use pidstat to display detailed information on processes. See the screen shot below.

Saturday, March 6, 2010

Monitoring Memory Usage in Linux Machines

For any one running a linux desktop/server , the amount of free memory available on the system  is one of the critical parameters that deterimine the system response. We will look at  some  commands which give you information about memory usage 


 free
   The free command provides the quickest way to see how much memory is being used on  your system. It shows the total amount of RAM   and swap space, along
with the amount currently being used.

Here are some examples of the free command:
$ free
             total       used       free     shared    buffers     cached
Mem:       2051656    1333508     718148          0     157452     461856
-/+ buffers/cache:     714200    1337456
Swap:      4416664          0    4416664

  free -m List memory usage in megabytes

  $ free -m
             total       used       free     shared    buffers     cached
Mem:          2003       1302        701          0        153        451
-/+ buffers/cache:        697       1306
Swap:         4313          0       4313

 free -b List memory usage in blocks
 sunil@Jaunty:~$ free -b
             total       used       free     shared    buffers     cached
Mem:    2100895744 1366093824  734801920          0  161419264  473022464
-/+ buffers/cache:  731652096 1369243648
Swap:   4522663936          0 4522663936
 
  free -mt List memory usage with totals displayed (Swap + Mem)


sunil@Jaunty:~$ free -mt
             total       used       free     shared    buffers     cached
Mem:          2003       1302        700          0        154        451
-/+ buffers/cache:        697       1305
Swap:         4313          0       4313
Total:        6316       1302       5013

     To avoid wasting RAM and speed up applications, Linux uses as much otherwise unused RAM as possible for the disc cache. For that reason, the first line of output from free that often shows little free RAM can be misleading. Please  pay closer attention to the second line of output, which shows the amount of RAM actually available for applications. That amount is 1305 MB in the above  example which shows
-/+ buffers/cache:        697       1305

 top 

The top command provides a means of watching the currently running processes, along with their memory usage.

$ top
 top - 10:53:00 up 29 min,  2 users,  load average: 0.42, 0.46, 0.45
Tasks: 199 total,   3 running, 196 sleeping,   0 stopped,   0 zombie
Cpu(s):  5.9%us,  2.6%sy,  0.0%ni, 91.5%id,  0.0%wa,  0.0%hi,  0.0%si,  0.0%st
Mem:   2051656k total,  1335604k used,   716052k free,   158124k buffers
Swap:  4416664k total,        0k used,  4416664k free,   462016k cached


To exit top, press q. Like the output for free, top shows total of memory usage for
RAM  and swap space. However, because top is screen oriented and
provides ongoing monitoring, you can watch memory usage change every three seconds (by default). 

   With top running, press Shift+m and the running processes will be
displayed in memory-use order (so you can watch which processes are consuming themost memory). See the screen shot above.
    The most useful column to analyze a process’ memory usage is RES, which shows the process’ actual physical RAM usage, also known as resident size.
The MEM column is based on this resident size. You can look at the man page of top for more information.

 vmstat

 This command gives you virtual memory statistics.


sunil@Jaunty:~$ vmstat
procs -----------memory---------- ---swap-- -----io---- -system-- ----cpu----
 r  b   swpd   free   buff  cache   si   so    bi    bo   in   cs us sy id wa
 1  0      0 682412 158804 489856    0    0    69    11  203  679  6  2 88  3
You can  view  memory use over a given time period. The following out put gives you vmstat every 5 seconds.

sunil@Jaunty:~$ vmstat 5
procs -----------memory---------- ---swap-- -----io---- -system-- ----cpu----
 r  b   swpd   free   buff  cache   si   so    bi    bo   in   cs us sy id wa
 0  0      0 682856 159000 489892    0    0    67    11  204  680  6  2 89  3
 1  0      0 682832 159004 489888    0    0     1     1  792 1969  4  2 94  0
 0  0      0 682684 159012 489892    0    0     0     2  752 1249  4  2 94  0
 0  0      0 682792 159012 489892    0    0     0     0  836 1839  4  2 94  0


The out put is printed every 5 seconds. To exit vmstat, press Ctrl+c. T$ vmstat -S m Display output in 1000k megabytes. You can try loading several applications and watch how the vmstat output changes .
   The kernel itself, however, has its own memory cache to keep track of its resources, called the kernel slab. You can use the vmstat command to display kernel slab memory cache statistics (from /proc/slabinfo) as follows:
sunil@Jaunty:~$ vmstat  -m
Cache                       Num  Total   Size  Pages
RAWv6                        23     23    704     23
TCPv6                        96     96   1344     24
flow_cache                    0      0     80     51
kcopyd_job                    0      0    264     31
dm_uevent                     0      0   2464     13
kmalloc_dma-512              16     16    512     16
mqueue_inode_cache           28     28    576     28
fuse_request                 62     63    376     21
       --------  ---       --------
kmalloc-16                 3772   4096     16    256
kmalloc-8                  6093   6144      8    512
kmalloc-192                9739  10038    192     21
kmalloc-96                  971   1008     96     42
          --- ----- ----
...
The slab memory cache information shows each cache name, the number of objects active for that cache type, the total number of objects available for that cache type, the   size of the cache (in bytes), and the number of pages for each cache. 

slabtop
  You can also use slabtop , similar to top to display the kernel slab info.
  

The slabtop output updates every three seconds. By default, slab caches are sorted by the number of objects (first column) in each cache. By pressing c you can sort by cache size instead.

Friday, March 5, 2010

Greyed USB drives on Virtual box Guests

   I use virtual box   on my Ubuntu  9.10 box to  run windows XP. ( I use it for some EDA tools like Proteus ). This morning Virtual Box prompted me  to upgrade to version. 3.1.4 and I upgraded it . When I tried to put my Usb Flash drive in the guest OS , the drive was shown grayed as in the screen shot below.


 I searched the net for a solution and finally did the following steps to fix it.
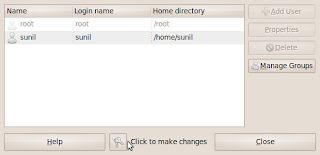
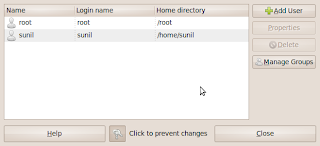
Click on System-> Administration->Users and Groups 


Click on the Key button near"click to manage "


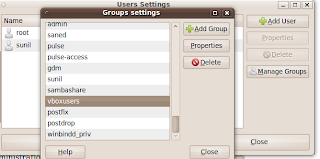
Click on Manage  groups and select vbx users from the box


Click on properites and  tick  your username.

   .

Now restart the computer. Next time when you start the machine your flash drives will be visisble..

How to install Mac fonts on Ubuntu

Some beautiful fonts from the mac world is available at http://ubuntu-debs.googlecode.com .You can install them to your ubuntu and enjoy the new fonts.

Download the fonts in a terminal .

$ wget http://ubuntu-debs.googlecode.com/files/macfonts.tar.gz
( I am not sure the download is strictly legal)
Extract the font files:

$ tar zxvf macfonts.tar.gz

Move the extracted fonts directory to the system fonts directory

$ sudo mv macfonts /usr/share/fonts

Reload the font cache:

$ sudo fc-cache -f -v

Thursday, March 4, 2010

How to install Picasa in Ubuntu 9.10

Google picasa is one of the best photo album managers available for windows and linux. Also, google provides web based album services. On ubuntu you can install picasa ( latest version is 3.0 beta) as detailed below.
Select System-> Administration -> Software Sources
Click on third party software. Add the following apt line.

deb http://dl.google.com/linux/deb/ stable non-free main
Click on add source and then close . System will ask you to reload the source. Do it. Open a terminal and import the google apt-key as below .

$ sudo wget -q -O - https://dl-ssl.google.com/linux/linux_signing_key.pub | apt-key add -apt-get update  


Now you can install picasa from synaptic. Or from the command line as


$ sudo apt-get install picasa 


The latest picasa 3.0 offers the following features.
  • Improved integration with Picasa Web Albums
  • You can sync your Picasa 3 and Web Albums edits, change your online album settings from Picasa, and delete online albums from Picasa.
  • Better uploading with the upload Drop-box and bandwidth throttling.
  • New Retouch tool to remove unsightly blemishes and improve photo quality.
  • Improved Collage tool lets you have total artistic control over your collage content and layout.
  • Auto red-eye: same results, less work for you.
  • Easily add text or watermarks to your photos.
Linux specific changes / improvements
  • User data are now stored in ~/.google/picasa/.
  • Camera/media detection integrated with Gnome/KDE.
  • Mozilla/Firefox browser integration done via a plugin.
  • picasa:// urls work in Firefox 3.
  • Downloading albums from Picasa Web Albums launches faster.
  • Better Xinerama support.

Wednesday, March 3, 2010

Clearing junk with BleachBit

Bleach bit is a utility which can free disk space, removes hidden junk, and easily guards your privacy. It can erase cache, delete cookies, clear Internet history, remove unused localizations, shred logs, and delete temporary files.
It supports around 70 applications and can be installed on windows and linux. On ubuntu bleachbit is available on the repository. However, it is a nice idea to look at the bleachbit website for any new versions.
On ubuntu you can install it with

$ apt-get install bleachbit

On my system running ubuntu 9.04 , two menu entries were added under Applications->system tools- Bleachbit and Applications->system tools- Bleachbit (root). If you launch it for the first time you will get the following screen.

This allows you to select the desired language also.

You can select junk data from various programs on the left pane. You can even preview the data before deleting it.

Tuesday, March 2, 2010

tar.gz, tgz and tar.bz2

On linux distributions we commonly see files named tar, tgz, tar.gz and tar.bz2. This note tries to explain common operations on such files.

tar
tar is used to create a Tape ARchive. ( tar is from the old unix era) The resulting file is known as a tarball. A tar ball concatenates files to a a sin get the files out of a tarball, you can extract a tarball using

tar -xvf something.tar

To create a tar archive , the following command can be used.

tar -c /home/mydir > mydir.tar

tgz and tar.gz

If the tarball has also been gzipped (compressed), the file will be named tar.gz or tgz .You can use the following command to extract it.

tar -xvfz something.tar.gz

If you want to create a tgz as below.
tar czvf myfolder.tar.gz myfolder/

tar.bz2

A tar.bz2 uses bzip2 compression on a tarball. Generally the size will be less that a tar.gz file .If you have a .tar.bz2 file , issue this command: ( You need bzip2 installed)

tar -xvjf file-1.0.tar.bz2
If you want to create a tar.bz2 as below.
tar cjvf myfolder.tar.bz2 myfolder/

Monday, March 1, 2010

Five Free PDF viewers for Ubuntu.

Portable document format is one of the most popular file formats on the web. Of course Adobe is the market leader for PDF. However, there are lot of free alternatives around. Here are some free pdf viewers for ubuntu.

a) Evince
Home Page http://projects.gnome.org/evince/


Evince is a document viewer for multiple document formats. It currently supports pdf, postscript, djvu, tiff and dvi. The goal of evince is to replace the multiple document viewers that exist on the GNOME Desktop with a single simple application.
Evince is installed by default on the ubuntu desktop.

b) xpdf

Home Page http://www.foolabs.com/xpdf/about.html
Xpdf is an open source viewer for Portable Document Format (PDF) files. Xpdf project also includes a PDF text extractor, PDF-to-PostScript converter, and various other utilities.

On ubuntu you can install xpdf as
$ sudo apt-get install xpdf

c) Okular

Home Page http://okular.kde.org/

This is from the kde stable . Okular is a universal document viewer based on KPDF for KDE 4.
On ubuntu you can install okular as
$ sudo apt-get install okular

d) epdf viewer

Home Page http://trac.emma-soft.com/epdfview/wiki/Download

epdf viewer is lightweight pdf viewer based on poppler libs. The aim of ePDFView is to make a simple PDF document viewer, in the lines of Evince but without using the GNOME libraries.

On ubuntu you can install epdfview as
$ sudo apt-get install epdfview

e) Gv

Home Page http://wwwthep.physik.uni-mainz.de/~plass/gv/
gv allows to view and navigate through PostScript and PDF documents on an X display by providing a user interface for the ghostscript interpreter.

On ubuntu you can install gv as

$ sudo apt-get install gv