Monday, January 31, 2011

How to spoof MAC id

Here we go, assuming you want to change the MAC id for eth0.

sudo ifconfig eth0 down 
sudo ifconfig eth0 hw ether 00:00:00:00:00:00      (choose your mac here)
sudo ifconfig eth0 up


Sunday, January 30, 2011

Alternate Characters from Keyboard

Engineers often need greek character while working with various programs . You can set up a second keyboard layout to switch between  normal english and greek characters. 

Here's how:
System -> Preferences -> Keyboard, then select Layouts Tab.

Click [Add] -> Country=Greece, Variants=Greece

You will see a diagram showing the new character set. Click [Add] then [Close].

On the main panel (near the date?) you should see an icon showing the current keyboard layout. Click this to change layouts then υοθ σηοθλδ βε αβλε το τυπε ιν γρεεκ.

You can also change your regular keyboard to use say "USA International (AltGr dead keys)". AltGr=Alternate Graphics=[Right Alt]. Some keys have 4 characters. Access the extra characters by pressing and holding the [Right Alt], then you can type þ & §.

How to play DVD Movies in Ubuntu Linux 10.10


  Install the libdvdread4 package (no need to add third party repositories) via Synaptic or command line:

$ sudo apt-get install libdvdread4

Run the following command 


$ sudo /usr/share/doc/libdvdread4/install-css.sh
 
Another Way

Saturday, January 29, 2011

Text Watermarking in linux

The traditional watermarking relies on embedding some information in a binary file (such a proprietary format doc - Adobe PDF, MS Word or multimedia files to identify the origin of a particular copy. Watermarking can be combined with steganography to hide this data from a casual viewer.

Snowdrop is intended to bring (relatively) invisible and modification-proof watermarking to a new realm of "source material" - written word and computer source codes. The information is not being embedded in the least significant portions of some binary output, as it would be with a traditional low-level steganography, but into the source itself.

Snowdrop provides reliable, difficult to remove stenographic watermarking of text documents (internal memos, draft research papers, advisories and other writing) and C sources (limited distribution software, licensed software, or freely available code) so that:

  * leaks can be identified if the data goes public.
  * Original source can be determined and demonstrated if part of the document is claimed by somebody else, copied without permission, etc ...

Snowdrop Installation:
Open terminal fromApplications -> Accessories  -> Terminal, and type following command

sudo apt-get install snowdrop
Using Snowdrop:
Snowdrop is a command line tool, the simple way to apply watermark to your source code is by using command ...
sd-c -i input.c output.c "secured"

Now, to extract or compare the watermark, use the following command ..
sd-c -e input.c output.c

Convert bin-cue images to iso in GNU / Linux

 
  Install the following  files via apt or software centre.
 
     sudo apt-get install bchunk sudo apt-get install bchunk
 

To convert  to open a terminal and just  type
 
bchunk  my_binfile.bin my_cuefile.cue   my_iso_image.iso 

and within seconds you'll have your iso image .... Enjoy

Friday, January 28, 2011

Graphical IP Blocker


This article describes how to block lists with a graphical front-end called IPblock. No knowledge of networking, firewalls or command-line configuration are needed. Due to the way IPblock works it doesn't change the behavior of existing firewalls which makes it compatible [1] with other firewall applications like ufw, shorewall or fireHOL. This howto is intended for Beginners and was tested on Ubuntu Feisty, Gutsy, Hardy, Intrepid, Jaunty and Karmic (32-bit and 64-bit).

Installation
Add the iplist repository to your sources.list. Make sure to use the correct sources.list that corresponds to your current distribution:
  • Ubuntu 10.10 "Maverick Meerkat":
    Code:
    sudo wget http://iplist.sf.net/sources.list.d/maverick.list -O /etc/apt/sources.list.d/iplist.list
  • Ubuntu 10.04 LTS "Lucid Lynx":
    Code:
    sudo wget http://iplist.sf.net/sources.list.d/lucid.list -O /etc/apt/sources.list.d/iplist.list
  • Ubuntu 9.10 "Karmic Koala":
    Code:
    sudo wget http://iplist.sf.net/sources.list.d/karmic.list -O /etc/apt/sources.list.d/iplist.list
  • Ubuntu 9.04 "Jaunty Jackalope":
    Code:
    sudo wget http://iplist.sf.net/sources.list.d/jaunty.list -O /etc/apt/sources.list.d/iplist.list
  • Ubuntu 8.10 "Intrepid Ibex":
    Code:
    sudo wget http://iplist.sf.net/sources.list.d/intrepid.list -O /etc/apt/sources.list.d/iplist.list
  • Ubuntu 8.04 "Hardy Heron":
    Code:
    sudo wget http://iplist.sf.net/sources.list.d/hardy.list -O /etc/apt/sources.list.d/iplist.list
The key of the signed packages can be imported like this:
Code:
sudo apt-key adv --recv-keys --keyserver keyserver.ubuntu.com C6E3D905C8BCD56BB02E6E0B39456311108B243F
There is also another way to import the key. You could save the pub key to a file and import it through System->Administration->Software Sources->Authentication->Import Key-file.

After an update of the Software sources iplist can be installed with any package manager. E.g.:
Code:
sudo apt-get update
sudo apt-get install iplist
Note: If sun-java* is installed by gdebi it requires to open the terminal part of gdebi and accept sun's license agreement.
Packages for Feisty and Gutsy can be found in the 0.19 release.

After the installation IPblock can be found in Applications -> Internet -> IPblock.


Lists

The default choice for lists is similar to PeerGuardian.
  • level1.gz - Anti-P2P organizations and known government addresses
  • ads-trackers-and-bad-pr0n.gz - Advertising and data tracker servers
  • spyware.gz - Malicious spyware and adware servers
  • edu.gz - Educational institutions and universities
  • bogon.gz - Spoofed IP-addresses
These lists are maintained by www.bluetack.co.uk (list descriptions). Custom p2p or dat lists can easily be added. Note that lists can optionally be compressed with gzip.
The URL file /etc/ipblock.lists contains list descriptions.


Settings

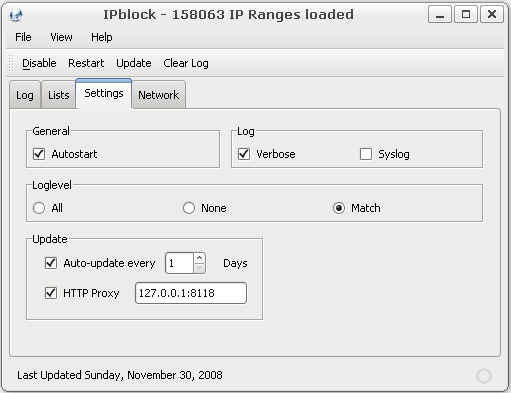
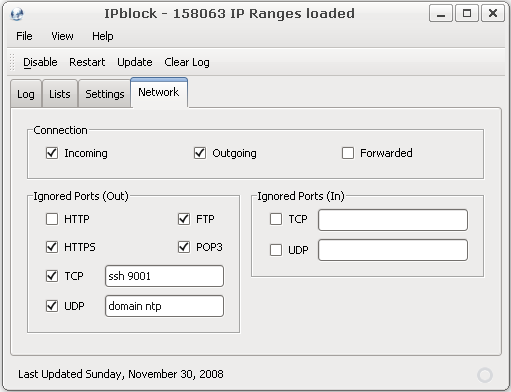
All options can be configured in this and the network tab. Auto-updating lists is important and the default choice of 2 days is reasonable. Using out-of-date lists is not recommended.
To ignore outgoing network traffic like HTTP or EMAIL (pop3) use the ignored ports section. Note that http and dns (domain) is ignored by default. The connection-settings specify which type of connections should be filtered.


Monday, January 17, 2011

How launch byobu automatially in Gnome terminal

Lanunch Gnome terminal. Click on Edit -profile preferences.. A window will pop up. click on Title and  Command.  Tick the button against  Run a custom command instead of my shell.  Set  byobu  as the  custom command.

The screen shot explains it all.


Saturday, January 15, 2011

How to change default in GNOME Terminal to xterm


Click on System ->prefferred Applications


 Change the terminal emulator to custom and  enter xterm  as the command to be executed.


Thursday, January 13, 2011

How to install Truecrypt on ubuntu 10.10

TrueCrypt is Free open-source disk encryption software for Windows XP/2000/2003 and Linux. If you are paranoid about your data being stolen and misused, truecrypt is your friend.

Some of the important features of truecrypt are as below.
1)  It can create a virtual encrypted disk within a file and mounts it as a real disk.
2) Truecrypt can  encrypt an entire hard disk partition or a device, such as USB flash drive.
3) Encryption is automatic, real-time (on-the-fly) and transparent.

True crypt provides two levels of plausible deniability, in case an adversary forces you to reveal the password:

a) Hidden volume (steganography).
b) No TrueCrypt volume can be identified (volumes cannot be distinguished from random data).

True crypt can use the following encryption algorithms:
AES-256,
Blowfish (448-bit key),
CAST5,
Serpent,
Triple DES,
Twofish.

You can download  truecryypt for your preferred operating systems from
 http://www.truecrypt.org/downloads. For linux  hosts 32bit and 64 bit code are available . Also you can find console only code.
I down loaded truecrypt7.0a ( the latest stable version from
 http://www.truecrypt.org/download/truecrypt-7.0a-linux-x86.tar.gz

The downloaded file may then be untarred and unziped using

 $ tar -xzvf  truecrypt-7.0a-linux-x86.tar.gz

Now if you look in your directory a  file named  truecrypt-7.0a-setup-x86 will be present.  You can install truecrypt by executing  this file as follows.

$ sh truecrypt-7.0a-setup-x86

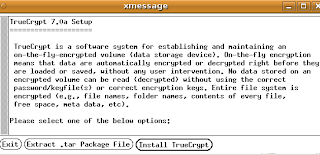
  Now a window will pop up as shown below.


You can  choose install  truecrypt. Another screen will follow asking you to agree to the licence. If you agree, the system will ask you the password for superuser access and will install true crypt in to /usr/bin/truecrypt
You can start up truecrypt from a command prompt as below.

 $ truecrypt

  Truecrypt screen will pop up as  shown below.

 
You can look at the documentation at  http://www.truecrypt.org/docs/  for using truecrypt .

How to get back ctrl alt backspace in ubuntu

Since Ubuntu 9.04, the Ctrl-Alt-Backspace key combination to force a restart of X is now disabled by default, to eliminate the problem of accidentally triggering the key combination. In addition, the Ctrl-Alt-Backspace option is now configured as an X keymap (XKB) option, replacing the X server “DontZap” option and allowing per-user configuration of this setting.
As a result, enabling or disabling the Ctrl+Alt+Backspace shortcut can now be done easily from the desktop.
Enabling Ctrl-Alt-Backspace for Ubuntu 10.04
* Select “System”->”Preferences”->”Keyboard”
* Select the “Layouts” tab and click on the “Layout Options” button.
* Select “Key sequence to kill the X server” and enable “Control + Alt + Backspace”.
Enabling Ctrl-Alt-Backspace for Kubuntu 10.04
* Click on the Application launcher and select “System Settings”
* Click on “Regional & Language”.
* Select “Keyboard Layout”.
* Click on “Enable keyboard layouts” (in the Layout tab).
* Select the “Advanced” tab. Then select “Key sequence to kill the X server” and enable “Control + Alt + Backspace”.

Wednesday, January 12, 2011

Digital speech in Ubuntu 10.10 maverick

You can make your ubuntu terminal speak to to using spd
Open up a terminal window and type this command:
$ spd-say test
Your computer will then say “test”.
If you  want to make your computer speak in complete sentences as below.
$ spd-say “ hello how do you do ?" 

You can even feed system variables into the spd-say command. For instance, to get spd-say to speak your current working directory:
$ spd-say $PWD

man spd-say for more details

Tuesday, January 11, 2011

How to reset mysql root password in Ubuntu /Debian linux

I for got my mysql root password last week.  , you can reset your mysql root password.
First You have to  Stop mysql server:
#service mysqld stop
Now Start mysql server in safe mode with Follwing Options:
#mysqld_safe –user=mysql –skip-grant-tables –skip-networking &
Now you have to Login to mysql server without password:
#mysql -u root mysql
You will get Mysql Prompt.
Type ‘help;’ or ‘\h’ for help. Type ‘\c’ to clear the current input statement.
mysql>
Now the Time for Resetting  mysql root password:
Run the following  commands very carefully  ( don’t miss semicolon  )
mysql> UPDATE user SET Password=PASSWORD(‘newrootpassword’) WHERE User=’root’;
mysql> flush privileges;
mysql> exit

5) Restart mysql server:
#service mysqld restart
6) Login to MySQL With the New Password:
root@server ]# mysql -u root -p
Enter password:
Type ‘help;’ or ‘\h’ for help. Type ‘\c’ to clear the current input statement.
mysql>

How to install a local ubuntu repository with apt-mirror

Begin by determining where you want your repositories to reside. You'll need plenty of drive space. Just as an example I'm mirroring Ubuntu 10.04 Lucid Lynx; 32 bit, packages only - no source code, all repositories and I'm using almost 40 gigs of space.

I'm using my mirror as the example for this tutorial and assuming your mirror will be used internally, not offered as an official mirror.

Start by installing apt-mirror and apache2:
System – Administration – Synaptic Package Manager.
Searching for apt-mirror then apache2 will give you the packages you need.
If you prefer to install using the terminal:

Code:
apt-get install apt-mirror apache2
Back up the configuration files:
Code:
sudo cp /etc/apt/mirror.list /etc/apt/mirror.list.orig
sudo cp /etc/apt/sources.list /etc/apt/sources.list.orig
sudo cp /etc/cron/apt-mirror /etc/cron/apt-mirror.orig
sudo cp /var/spool/apt-mirror/var/postmirror.sh /var/spool/apt-mirror/var/postmirror.sh.orig
This can also be done without the terminal by opening each file in your chosen text editor (gedit for example) and choosing “save as” to place the backup copy in your home folder.

Now edit the files. The examples use nano, but gedit can also be used by invoking it within a terminal using gksudo.

Starting with mirror.list:
Code:
sudo nano /etc/atp/mirror.list
The config section of the file should not require any editing.
For the most part, the repositories section should be okay with its default entries as well. You might want to add the partner repository by adding this line:
Code:
deb http://archive.canonical.com/ubuntu lucid partner
You might also want to pull your security updates from security.ubuntu.com which would require this modification:
Code:
deb http://security.ubuntu.com/ubuntu lucid-security main restricted universe multiverse
You can also remove or comment out the lines dealing with source code if you don't expect to need or use them. You can always add repositories later if you want. The time it takes to populate your mirror after adding something is less than the initial population of your mirror, so you can start with the minimum and add more later as the need arises.

Add a couple of lines to the “clean” section to clean up the extra repositories if you added or modified them as above:
Code:
clean http://archive.ubuntu.com/ubuntu
clean http://security.ubuntu.com/ubuntu
clean http://archive.canonical.com/ubuntu
Now you can run apt-mirror for the first time. You might want to wait on this step since it will take a while for your mirror to build, overnight for example. Also note that apt-mirror should be run as the user apt-mirror.
Code:
sudo su apt-mirror
apt-mirror
You'll see it working, but it will appear slow.

Once the mirror is populated, link the repository to the web server:
Code:
sudo ln -s /var/spool/apt-mirror/mirror/archive.ubuntu.com/ubuntu /var/www/ubuntu
sudo ln -s /var/spool/apt-mirror/mirror/security.ubuntu.com/ubuntu /var/www/security
sudo ln -s /var/spool/apt-mirror/mirror/archive.canonical.com/ubuntu/ var/www/canonical
NOTE: Only the first entry is necessary if you don't add or modify repositories.

Now edit postmirror.sh to invoke the clean script:
Code:
sudo nano /var/spool/apt-mirror/var/postmirror.sh
Add this line:
Code:
/var/spool/apt-mirror/var/clean.sh
Then make both scripts executable:
Code:
sudo chmod u+x /var/spool/apt-mirror/var/clean.sh
sudo chmod u+x /var/spool/apt-mirror/var/postmirror.sh
Finally, make apt-mirror an automated task:
Code:
sudo nano /etc/cron.d/apt-mirror
and remove the comment from the last line.


Moving to the client side:
Edit the sources.list file that will be used to access the mirror.
Code:
sudo nano /etc/apt/sources.list
The example below assumes using the mirror from the computer that hosts it. Using it from other computers on the network simply requires changing the IP address from 127.0.0.1 to whatever IP address is assigned to the mirror host.
Code:
deb http://127.0.0.1/ubuntu lucid main restricted universe multiverse
deb http://127.0.0.1/ubuntu lucid-updates main restricted universe multiverse
deb http://127.0.0.1/ubuntu lucid-backports main restricted universe multiverse
deb http://127.0.0.1/ubuntu lucid-proposed main restricted universe multiverse
deb http://127.0.0.1/security lucid-security main restricted universe multiverse
deb http://127.0.0.1/canonical lucid partner
On a side note, I've seen it recommended a couple of places that you pull your security updates from their original source rather than a mirror. If you choose to do that you want to leave this line for lucid-security unchanged:
Code:
deb http://security.ubuntu.com/ubuntu lucid-security main restricted universe multiverse
__________________

Sunday, January 9, 2011

how to disable login sound on ubuntu 10.10

To disable login sound:

Code:
echo -e '\n[Desktop Entry]\nType=Application\nName=GNOME Login Sound\nComment=Plays a sound whenever you log in\nExec=/usr/bin/canberra-gtk-play --id="desktop-login" --description="GNOME Login"\nOnlyShowIn=GNOME;\nAutostartCondition=GNOME /desktop/gnome/sound/event_sounds\nX-GNOME-Autostart-Phase=Application\nX-GNOME-Provides=login-sound\nX-GNOME-Autostart-enabled=false' > ~/.config/autostart/libcanberra-login-sound.desktop
To renable:
Code:
rm ~/.config/autostart/libcanberra-login-sound.desktop