Sunday, February 28, 2010

Using find to locate files

The GNU find command is a wonderful utility that can locate files on your Ubuntu system. The find command is part of the GNU findutils and is installed on every Ubuntu system.

The following paragraphs explain the basics of find .

The man pages show the syntax for using find as:

find [-H] [-L] [-P] [path...] [expression]

The optional flags [-H] [-L]
[-P] are not used commonly. They are useful only if your search want to follow
symbolic links. By default find command will not follow symbolic links.


The option [ path] refers to the location where your search should start.

The option [expression] refers to the way in which find should work.

Locating Files by Name

This seems to be the most common use of find. Try the following command on a terminal.

 $ find $HOME -name 'myfile.mp3' 

Note that I have quoted the name of the file to be found out. This must be made a habit, other wise you may get strange results ,especially when the file names have embeded spaces.

Find can accept wild cards like ? and * . If you wished to search for all of the mp3 files in your home directory, some of which you think might be named 'MP3' rather than 'mp3', you can run:

find $HOME -iname '*.mp3' 

The option -iname imposes case insensitivity on the search.

Locating Files by Size

Often you will look for big files in your home folder to save up some space . This can be done with

find $HOME -iname '*.mp3' -size +100M 

Other possible options with size are K and G for kilobytes and Giga bytes.

The above search can be modified to look for files less than 100MB as below.

find $HOME -iname '*.mp3' -type f -size -100M 

Locating Files by Access Time

It is also possible to locate files based on their access time or the time that they were last used, or viewed by the system. For example to show all files that have not been accessed in the $HOME directory for 30 days or more:

find $HOME -atime +30

You can combine various options to get better results. For example you can search for all mp3 files in the $HOME directory that have an access time of greater than 30 days:

find $HOME -iname '*.mp3' -atime +30

How to remove empty spaces in filenames

One of my friends gave me a collection of mp3 files last week . The files were ripped and converted to mp3 on windows platform. Even though music was excellent, the files or rather file names were not very pleasing . They all had empty spaces in in the file names. Some of them looked like this.
"my mp3 collection file1.mp3"
As I am using Ubuntu , I decided to strip of the empty spaces and put under score instead. The command for this is

rename "s/ /_/g" "my mp3  collection file1.mp3"

This worked for files with single spaces. There were some files with multiple spaces like
"my mp3 collection file1.mp3" . The above command will put under score for each space. Try the following command.


rename 's/\ * /_/g' "my mp3 collection file1.mp3"

This will fix multiple spaces with a single under score. This hack can work on all unix variants.

Wednesday, February 24, 2010

IDE for ada development

Here are some of the integrated development environments for Ada programmers.

For linux
a) GNAT GPL and SPARK GPL Editions

b) Emacs

If you are an emacs pro , try emacs ada mode from here

For Windows

a) Eclipse
Hibachi - Eclipse Ada Development tool
b) Adagide
Adagide is a cool ada ide for windows. Get it from here

Monday, February 22, 2010

Compiling Ada with gcc

One of my students wanted to to compile Ada  on ubuntu for a project he is working with. He came to me for help. But Ada is like chinese to me. How ever I  managed to compile a simple hello world progam. as below on Ubuntu 9.04

Install GNAT (GNU New York University Ada Translator):
Code:

sudo apt-get install gnat

Here is the hello.adb

with Ada.Text_IO;

procedure Hello is
begin
   Ada.Text_IO.Put_Line("Hello, world!");
end Hello;

And use this command to compile:

$ gnat make hello.adb

You will get hello.ali and a binary hello in your home directory.

Alternately you can split the steps 

1. Run gcc to compile to object file:
Code:

gcc -c hello.adb

2. Run gnatbind to produce binder output:


gnatbind hello.ali

3. Run gnatlink to link and produce executable output:


gnatlink hello

Sunday, February 21, 2010

How to install skype on Ubuntu 9.10

     Skype seems to be the most popular application which is missing from ubuntu 9.10. Earlier it was available on medibuntu repositories and there are several howtos which explains installation from medibuntu.  If you want to  install skype, the best method is to go to the skype site and download the deb files they provide. The files are for ubuntu 8.10. However it will work fine on 9.10
 Get the debs from here.
32 -bit
64 -bit

Once you have downloaded the deb file , double click on the file. The gdebi package installer will be started and it will ask for your password.  Follow the on screen prompts and finish the install.
You can  add skype to your start up as below.

Go to "System -> Preferences -> Startup Application", Click "Add" and enter the following details:

  • Name: Skype
  • Command: skype


Click on Save.  Next time you start your system Skype will auto-launch.
Enjoy using Skype in ubuntu

Saturday, February 20, 2010

Findwild

Findwild is utility program to search for files. It works quite differently from other file search programs you have seen. It has a GUI interface and can recall past searches.

The following search criteria are available:

  • directory path to search, with multiple wildcards ( * ? ) placed anywhere
  • file name(s) to search for, with multiple wildcards anywhere
  • file name(s) to exclude, with multiple wildcards anywhere
  • file content string(s) to search for, with multiple wildcards anywhere
  • file content string(s) to exclude, with multiple wildcards anywhere
  • file creation/modification date within a desired range
  • your choice of delimiters for search strings (defaults provided)
  • search the list of files produced by the previous search

Programmers may find this program useful to search a large source library for references to a symbolic name (e.g. find linux header file for a particular function or symbol).

Tarball with source code, make file, user guide: downloads
DEB and RPM package: packages

screenshot

How to convert 3gp movies to avi

Most of the mobile phones with video cameras produce movies in 3gp format. If you want to convert them to avi format you can follow the following steps.

a) Copy the movie from your mobile to your PC . Let the name of the movie be mymovie.3gp

b) - Install mencoder. It is part of the mplayer package and available in the mutiverse repository on ubuntu
$ sudo apt-get install mencoder

c) Covert the to avi with following command.

$ mencoder mymovie.3gp -ovc lavc -lavcopts vcodec=msmpeg4v2 -oac mp3lame -lameopts vbr=3 -o mymovie.avi''

Friday, February 19, 2010

How to limit ssh login to specific users

By default, SSH will permit every user with an account on the machine on which it runs. You can control access to the server as below.
Open /etc/ssh/sshd_config in your favourite editor (as root). Add the following lines below the authentication section.
AllowUsers user1 user2
This will allow only users user1 and user2 access to login via SSH.
Save the file /etc/ssh/sshd_config and restart ssh.
#/etc/init.d/ssh restart

Ony users user1 and user2 will be able to login via SSH.

Thursday, February 18, 2010

How To disable root access via SSH

If you are planning to deploy openssh on any server, you must secure it from hackers. There are several programs on internet which can launch a brute force attack against your ssh server. The first step to a secure ssh server is to disable root access via ssh. Brute force attackers often try to guess root password using dictionary attack.

Open /etc/ssh/sshd_config file using your favorite editor. You must be root to do this.

Scroll down the file until you locate
LoginGraceTime 120
PermitRootLogin yes
StrictModes yes
Modify PermitRootLogin to
PermitRootLogin no
You can save the file and restart ssh server . On ubuntu you can do this as below.

# /etc/init.d/ssh restart

After restarting SSH, try to connect using the root account. Access will be denied. However , if you want to access root from a remote machine via ssh, login using a normal user account and use su to become root.


Open office 3.2 on karmic koala

Ubuntu 9.10 Karmic koala comes with Open office 3.1 . The current stable version of OO is 3.2 . You can very easily upgrade your system to OO3.2

a) Grab the installation file from http://download.openoffice.org/ . A deb file is available as OOo_3.2.0_LinuxIntel_install_en-US_deb.tar.gz . Download it .

b) Unzip and untar it to make a proper deb

$ tar -xzvf OOo_3.2.0_LinuxIntel_install_en-US_deb.tar.gz

This will create a folder named OOO320_m12_native_packed-1_en-US.9483.
You will see several other folders inside it. The deb files for OO3.2 is in OOO320_m12_native_packed-1_en-US.9483/Deb folder

c)
Remove the current OO installation

$ sudo apt-get remove openoffice*.*

d) Install OO 3.2 debs
$ cd OOO320_m12_native_packed-1_en-US.9483/Deb
$ sudo dpkg -i *.deb

e) Finally install OO 3.2 menus
$ cd /desktop-integration/
$ sudo dpkg -i openoffice.org3.2-debian-menus_3.2-9472_all.deb


Wednesday, February 17, 2010

How to Protect Linux Users from Repetitive Strain Injury


If you are a hard core computer geek , you may be affected by Repetitive Strain Injury (RSI) . RSI is an injury of the musculoskeletal and nervous systems that may be caused by repetitive tasks, forceful exertions, vibrations, mechanical compression (pressing against hard surfaces), or sustained or awkward positions.

You can beat RSI if you install Workrave on your linux machine. This program will frequently alert you to take micro-pauses, rest breaks and restricts you to your daily limit. It tracks all of your keyboard and mouse activity. You can configure it to preplan your activity. A must for linux geeks.

Workrave is available as a package in the ubuntu repository.

$sudo apt-get install workrave will take away all your RSI troubles :D


Curtsey http://shibuvarkala.blogspot.com/ for the info.

Adding repositories with add-apt-repository

add-apt-repository is a helper script available on Ubuntu 9.10 for adding apt repositories .
For example
$ sudo add-apt-repository ppa:gnome-desktop
will add the gnome repository from the launch pad.


How to setup Chrome as your default browser on Ubuntu

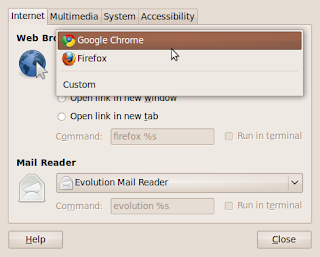
Today, one of my students asked me how to change the default browser to Google chrome on Ubuntu.. This can be done as shown below.

Click on System-Preferences->Preferred Applications.


The screenshot above is self explanatory. Also note that you can change how your browser will start up from the above screen. It may also be noted that options exist for changing several default applications to your preferred ones via different tabs on the above screen. I also changed my media player from Rythmbox to VLC.

Tuesday, February 16, 2010

Manage TTF fonts with fonty python

Fontypython is a small utility that can manage, view and find your fonts on Gnu/Linux. It can handle TTF, OTF, TTC and Type1 fonts. Fontypython is available on Ubuntu repository. On karmic you can install it with,
$ sudo apt-get install fontypython

Once installed , you can run fontypython from a terminal

$fontypython


Now get some fonts from Internet. I downloaded , ml_tt_karthika a font for Malayalam into my downloads folder and clicked on the that folder . All the available fonts will be displayed with a privies on the
Now the screen looks like this.


Click on new pog


A window will pop up asking you to give a name.

Now select the new pog you created and then click on the font you want to add to the pog. ( A pog is a collection of fonts.) A red tick mark will appear on the font as below.


Then click on put into ( Karthika) button on the bottom and then click on install pog.
Your font will be now installed and applications can start using the new font.