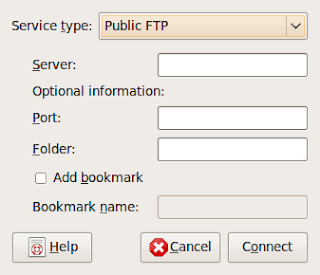
Ubuntu 9.04 desktop support accessing remote file system from the places menu. Click on Places->Connect to server . You will get the following pop up.
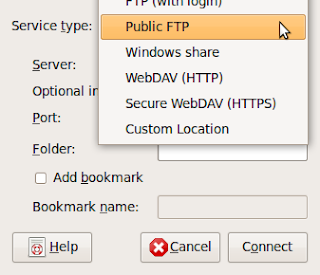
The different possible server types are shown below.
If you want to connect to a windows share , select the specific options and fill in the details. You can book mark the share with a name so that next time you can quickly connect to the share. The bookmark also appears in Nautilus.
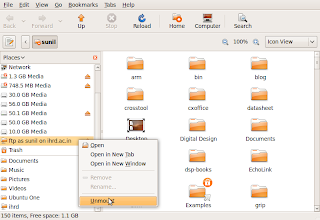
If you want to remove a bookmark , right click on it in Nautilus and unmount it. See the screen shot below.
Thursday, July 30, 2009
Wednesday, July 29, 2009
Installing Sun Java on Ubuntu
Java run time and java plug n is an essential component you need on any decent linux desktop.
They are required for running applications as well as browsing java enabled web pages. Several flavours of java is available on the repository. Some of them may not have full functionality. Here's how to install Java run time and java plug in on ubuntu. Even though Java was a popular environment on many platforms, the linux distributions were not bundling it due to the restrictive licecnse . Recently, however, Sun Microsystems relaxed the restrictions on the Java license, introducing the Distro License for Java (DLJ). This new license allows distributors to ship Sun's JRE and Java Development Kit (JDK) as installable packages, rather than the self-extracting binaries that were previously available. It also gives Linux distributors the ability to define the packaging, installation, and support for Java within their Linux distribution.
As such, ubuntu 9.04 Jaunty now ships with Sun's Java available as a non-free package in the multiverse repository. You'll need to have the universe and multiverse repositories enabled to install Java.
On ubuntu the java is available as several components which you can use as per your requirement. Both java 5 and java 6 packages are available.
Try apt-cache search sun-java and see the full list of java related packages Some of the important packages you may see are,
sun-java5-bin Contains the binaries
sun-java5-demo Contains demos and examples
sun-java5-doc Contains the documentation
sun-java5-fonts Contains the Lucida TrueType fonts from the JRE
Contains the metapackage for the JDK
sun-java5-jre Contains the metapackage for the JRE
sun-java5-plugin Contains the plug-in for Mozilla-based browsers
sun-java5-source Contains source files for the JDK
A similar set of pakages exists for java 6
Installing the Java Runtime Environment
Once you've got the multiverse repository enabled, installing Sun's Java package is easy. Simply open a terminal window and apt-get the package.
~$ sudo apt-get install sun-java5-jre sun-java5-plugin sun-java5-fonts
Once apt-get downloads the packages and begins the installation, you'll get a screen that contains the Sun Operating System Distributor License for Java. Read the license, if you wish, and hit Enter to continue. You'll see a dialog that asks you if you agree with the DLJ license terms. Select Yes, and hit Enter; the JRE will finish installing.
At this point, Java is installed.
You'll want to confirm that your system is configured properly for Sun's JRE. This is a two-step process. First, check that the JRE is properly installed by running the following command from a terminal. You should get similar output:
$ java -version
java version "1.6.0_13"
Java(TM) SE Runtime Environment (build 1.6.0_13-b03)
Java HotSpot(TM) Server VM (build 11.3-b02, mixed mode)
If you see an unexpected version of Java in particular some thing like the lines below, you may have Open JDK installed.
java version "1.6.0_0"
OpenJDK Runtime Environment (IcedTea6 1.4.1) (6b14-1.4.1-0ubuntu7)
OpenJDK Server VM (build 14.0-b08, mixed mode)
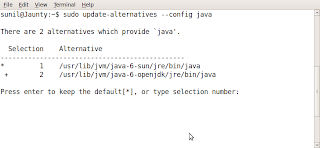
You can easily switch from one Java to another with the following command
$ sudo update-alternatives --config java
See the screen shot below
If the JRE is properly installed, confirm that the Java plug-in is installed in your browser by opening Firefox and typing about:plugins in the address bar . Look for java and verify that it is enabled.
Installing Java compiler.
If you are planning to develop applications using java , you can install jdk as below.
$ sudo apt-get install sun-java5-jdk
Tuesday, July 28, 2009
Elinks : A fast text mode web browser
If you want to read long web pages and don't like to see the dirty graphics , install elinks. It is available on almost all distributions.
On ubuntu you can install it as follows
$ sudo apt-get install elinks
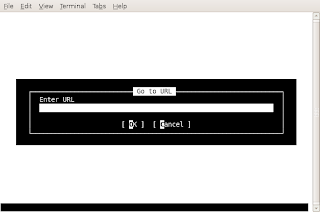
Once installed , open a console and type elinks. you will get the following
You can enter a URL and start browsing.
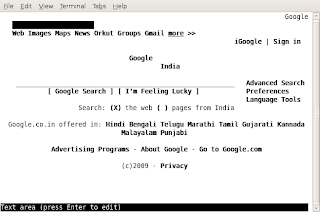
See the google page below.
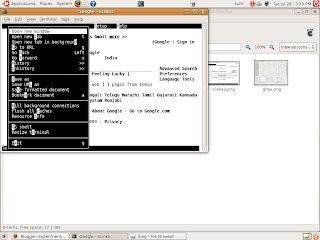
Elinks is basically a console program and can be manipulated form keyboard. ( The mouse also will work ). You can access the elinks menu by pressing escape key. See the screen shot below.
The elinks browser support most of the modern web features. I enjoy browsing with elinks as it gives me extremely fast response while browsing the net.
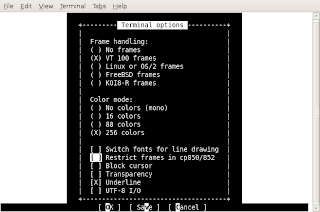
Now let us enable some more features. Press escape and enable menus. Select Setup-> terminal options. Enable Vt100 frames , 256 colors and underline.
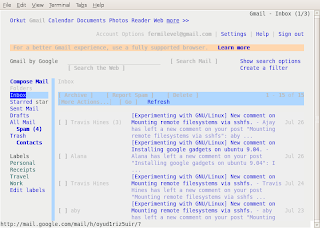
Now try gmail with elinks.
You can navigate the web page with arrow keys . There are some more short cuts that you can use. Have a look at the menus.
Wednesday, July 22, 2009
Mounting remote filesystems via sshfs
If you have access to a remote computer via ssh , it is possible to mount your home directory on the remote machine locally.
Let us assume the following.
You have an account on a remote machine A with IP a.a.a.a and you are working on a local machine B. You want to mount the your home directory on A to a folder on B. I am also assuming that both the machines are running Ubuntu/Debian.
Step 1
On machine A install open-ssh server.
$ sudo apt-get install open-sshserver
Step 2
Ensure that you are able to log in to A from B via ssh
$ ssh fermi@a.a.a.a
This will prompt you with a key finger print of A and ask you whether you want to add this key to the list of trusted machines. Accept the key. Now it will prompt for the password on the remote machine.
Log out from A by typing logout.
Step 3
Install sshfs and fuse-utils on the local machine B.
$ sudo apt-get install fuse-utils sshfs
Step 4
The sshfs package can mount remote directories / filesystems via fuse. (FUSE is file systems in user Space). On ubuntu , you must be a member of fuse group to access FUSE.
You can manually edit /etc/groups to add your user name to fuse group. Or it can be done from System->Administration->Usersand Groups on Gnome desktop ( on ubuntu).
Step 5
Create a directory on the local machine.
$mkdir remote_dir
Now, mount the remote directory.
$ sshfs fermi@a.a.a.a: remote_dir
(There is a colon after the IP address above) . You home directoy on the remote machine A will be visible under remote_dir folder.
You can unmount the remote directory with the following command.
$ fusermount -u remote_dir
Monday, July 20, 2009
How to install DHCP server on Ubuntu
Today I had to set up dhcp server on a machine running Ubuntu 9.04. The machine was supposed to serve 10 other machine running ubuntu/windows xp. Here is the steps I followed.
Install static IP on the machine. ( I selected 192.168.0.1 as the IP for the machine running dhcpd )
$ sudo apt-get install dhcp3-server
Now edit the /etc/dhcp3/dhcp3d.conf.
The default config file supplied with the dhcpd package is some what cumbersome. I replaced it with the following simple file
# dhcpd.conf config file.
Then I restarted the server .
$ sudo /etc/init.d/dhcp3-server restart
The above configuration file will serve IP range from 192.168.0.20 to 192.168.0.250. If you have a different IP scheme modify the values as required. In fact , there are several other options for dhcpd which you can control. The original config file has some examples settings explained in it.
If you have multiple interfaces on the machine, modify /etc/default/dhcp3-server file to specify which interface the server should run.
Install static IP on the machine. ( I selected 192.168.0.1 as the IP for the machine running dhcpd )
$ sudo apt-get install dhcp3-server
Now edit the /etc/dhcp3/dhcp3d.conf.
The default config file supplied with the dhcpd package is some what cumbersome. I replaced it with the following simple file
# dhcpd.conf config file.
authoritative;
subnet 192.168.0.0 netmask 255.255.255.0 {
range 192.168.0.20 192.168.0.250;
option domain-name "mynet.local";
option domain-name-servers 192.168.0.1;
option broadcast-address 192.168.0.255;
option routers 192.168.0.1;
# next-server 192.168.0.1;
# get-lease-hostnames true;
option subnet-mask 255.255.255.0;
}
Then I restarted the server .
$ sudo /etc/init.d/dhcp3-server restart
The above configuration file will serve IP range from 192.168.0.20 to 192.168.0.250. If you have a different IP scheme modify the values as required. In fact , there are several other options for dhcpd which you can control. The original config file has some examples settings explained in it.
If you have multiple interfaces on the machine, modify /etc/default/dhcp3-server file to specify which interface the server should run.
Sunday, July 19, 2009
Searching your ubuntu Desktop with beagle
Beagle is a free desktop search tool which is gaining popularity with several applications. You can search your desktop just as you search with google. It is possible to use beagle as a standalone search tool or integrate with applications such as firefox for easy desktop search. In fact, it is one application that any serious Linux user can not ignore.
Installing beagle
On ubuntu 9.04, beagle is available in the universe repository. You can install it using
$ sudo apt-get install beagle
The beagle package for other distributions are also available . Look at the beagle project home page.
What does it do ?
Once installed , beagle is run as a daemon in the background. It will start indexing the following information based on the configuration.
Documents
Emails & attachments web history IM/IRC conversations addressbook contacts calendar appointments notes source code images music/video files archives and their contents applications The indexing is done in real time . Files are immediately indexed when they are created, are re-indexed when they are modified, and are dropped from the index upon deletion.E-mails are indexed upon arrival. IM conversations are indexed as you chat, a line at a time. Web pages are indexed as you view them.
Using beagle
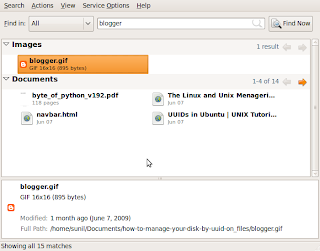
You can use beagle in several ways. The easiest way is to use the graphical interface. Click on Accessories --> Search . You will get the following search screen.
Installing beagle
On ubuntu 9.04, beagle is available in the universe repository. You can install it using
$ sudo apt-get install beagle
The beagle package for other distributions are also available . Look at the beagle project home page.
What does it do ?
Once installed , beagle is run as a daemon in the background. It will start indexing the following information based on the configuration.
Using beagle
You can use beagle in several ways. The easiest way is to use the graphical interface. Click on Accessories --> Search . You will get the following search screen.
You can type the search query in the text box provided. The result are shown in the second panel. You can preview the results by clicking on the result. There are several command line options you can try. Please look at this page for more details.
You can do beagle queries from the command line too.
$ beagle-query blog
The above command will search for blog in the beagle index.
Similarly, you can print status of the beagle daemon with
$beagle-status
Adding beagle to firefox
There are two possibilities with firefox.
a) Index all web pages that you browse
b) Use firefox as client for beagle search.
a) You can index the pages you browse using beagle. Download this extension. Save it to your hard disk. Inside firefox, click on File->open and then select the downloaded xpi file. It will prompt you to install the beagle extension. Restart firefox. A small icon will appear near the bottom corner of your browser window. You can control indexing by clicking on that button.
b) Now let us configure fire fox as a client for beagle. You can add an entry like google search box to firfox and do local searches. For this enable network web interface in beagle.
Open beagle gui search from accessories . Click on Search->Preferences -> network options. Check enable web interface for local search. Now click on this link. It will install beagle search for your firefox.
Saturday, July 18, 2009
Creating your own ubuntu packages with checkinstall
Checkinstall is a beautiful program which lets you create your own debs or rpms. This program is available in the Ubuntu universe repository. Using it you can quickly build your own ubuntu packages from source code.
You can install it on Ubuntu 9.04 as below.
$ sudo apt-get install checkinstall
Now download the source package of the program you want to convert to a deb.
Let us take CenterIM , a text mode IM client.
Download the source.
$wget t http://www.centerim.org/download/mobshots/centerim-4.22.7-36-g6ba0.tar.gz
Untar the archive
$ tar -xzvf centerim-4.22.7-36-g6ba0.tar.gz
Try to compile the code.
$ cd centerim-4.22.7-36-g6ba0
Run the configure script to create makefile.
$ ./configure
Now invoke checkinstall.
$ sudo checkinstall -D --install=no
( checkinstall needs root access)
If some of the required directories such as doc--pack is not available it will prompt you to create them and finally show the following screen.
*****************************************
**** Debian package creation selected ***
*****************************************
This package will be built according to these values:
0 - Maintainer: [ fermi@unixlab.blogspot]
1 - Summary: [ Centrim new package ]
2 - Name: [ centerim-4.22.7-36 ]
3 - Version: [ g6ba0 ]
4 - Release: [ 1 ]
5 - License: [ GPL ]
6 - Group: [ Applications/System ]
7 - Architecture: [ i386 ]
8 - Source location: [ centerim-4.22.7-36-g6ba0 ]
9 - Alternate source location: [ ]
10 - Requires: [ ,/bin/sh ]
11 - Provides: [ centerim-4.22.7-36 ]
Enter a number to change any of them or press ENTER to continue:
You can edit the above details as you require and finally press ENTER
Checkinstall will compile and make a debian package for you. It can fail during compilation if the libraries need for compiling the program that you are trying to build is not installed.
You can also create other packages for redhat or slackware based systems. The man pages of checkinstall list lot of options. Have a look at it.
Friday, July 17, 2009
CenterIM: A text mode instant messenger client
Most of the Linux users use pidgin as a universal instant messenger client. Popular distributions such as ubuntu will install pidgin by default. CenterIM ( aka cim) is a multi protocol text mode instant messaging client similar to pidgin. Let us see how it can be installed on ubuntu.
The ubuntu universe repository has centerim available as a deb package which can be installed directly via apt. However, the version supplied with Ubuntu 9.04 is dated and if you install it yahoo protocol will not work.
So download the latest centerim tarball form the home page.
$ wget http://www.centerim.org/download/mobshots/centerim-4.22.7-36-g6ba0.tar.gz
( Look at the download page for any possible updates.)
Untar the archive
$ tar -xzvf centerim-4.22.7-36-g6ba0.tar.gz
Try to compile the code.
$ cd centerim-4.22.7-36-g6ba0
$ ./configure
$ make
$ sudo make install
For me the configure step above failed initially saying that libssl is need for yahoo protocol . It was solved by installing libssl-dev.
$sudo apt-get install libssl-dev
If the configure step above complains about any missing library , install the development version of the library. You may get a few such errors depending on your installation.
Once CenterIM is compiled and installed you can use it for the following protocols.
ICQ
Yahoo
AIM
jabber
Gadu-Gadu
MSN Messenger
RSS Reader
LiveJournal client
The interface is somewhat cryptic and needs some effort to get used too. Still, I like CenterIM as a text mode replacement for pidgin.
Wednesday, July 15, 2009
Finding out how much disk space you use
Sufficient quantity of free disk space is an absolute necessity irrespective of the Linux distro that you run. We can find out statistics about disk usage with certain simple command line utilities. Let us explore a few of them.
Let us try the df command
It prints the disk usage on u physical drives and some special directories.
At the creation of a file system on a disk the number of i nodes are fixed. If you have a large number of small files you can run out of i-node. The following example list the i-node utilization.
You can find the file system type with -T flag
You can check usage of disk space by a particular file or directory wth du command
The above example lists the usage of SAS by SAS directory.
On ubuntu systems you can find out the total space used by all users with
You can specify multiple directories with the -c option and total them up.
You can exclude files that match a certain pattern from being counted using the exclude option. See the following example which excludes iso images from being counted.
You can specify what depth in the tree you want to summarize. Set --max-depth to a number greater than 1 to dig deeper into disk space usage:
Let us try the df command
~$ df -h
Filesystem Size Used Avail Use% Mounted on
/dev/sda5 91G 62G 25G 72% /
varrun 497M 116K 497M 1% /var/run
varlock 497M 0 497M 0% /var/lock
It prints the disk usage on u physical drives and some special directories.
At the creation of a file system on a disk the number of i nodes are fixed. If you have a large number of small files you can run out of i-node. The following example list the i-node utilization.
$ df -hiIf you have network mounts (such as Samba or NFS), these will show up too in your df output. To limit df output to local file systems, type the following:
Filesystem Inodes IUsed IFree IUse% Mounted on
/dev/sda5 5.8M 436K 5.3M 8% /
$ df -hl
Filesystem Size Used Avail Use% Mounted on
/dev/sda5 91G 62G 25G 72% /
You can find the file system type with -T flag
$ df -hT
Filesystem Type Size Used Avail Use% Mounted on
/dev/sda5 ext3 91G 62G 25G 72% /
You can check usage of disk space by a particular file or directory wth du command
$ du -h SAS
220K SAS/lesson2_files
52K SAS/lesson5c_files
144K SAS/lesson5_files
136K SAS/lesson5b_files
76K SAS/lesson6_files
68K SAS/lesson6_1_files
148K SAS/lesson3_files
448K SAS/lesson7_files
8.0K SAS/lesson1_files
168K SAS/lesson4_files
1.6M SAS
The above example lists the usage of SAS by SAS directory.
On ubuntu systems you can find out the total space used by all users with
$sudo du -sh /home
55G /home
You can specify multiple directories with the -c option and total them up.
$ sudo du -sch /home /var
55G /home
293M /var
55G total
You can exclude files that match a certain pattern from being counted using the exclude option. See the following example which excludes iso images from being counted.
$ sudo du -sh --exclude=’*.iso’ /home/fermi
588M /home/fermi
You can specify what depth in the tree you want to summarize. Set --max-depth to a number greater than 1 to dig deeper into disk space usage:
$ sudo du -h --max-depth=2 /home
...
4.0K /home/fermi/Mail
52K /home/fermi
55 G /home
Tuesday, July 14, 2009
Installing google gadgets on ubuntu 9.04
Google is a nice addition to your ubuntu 9.04 desktop. Here is how I installed it.
Get the deb package from http://www.getdeb.net/release/3767
$ sudo dpkg -i google-gadgets_0.10.5-1~getdeb2_i386.deb
If it asks for any dependency , install them too.
Open a terminal and run
$ ggl-gtk
Now the google gadget panel will appear on the screen. There are lot of cool gadget available. You can install them by right clicking on the gadget panel.
Monday, July 13, 2009
Backing Up tar Archives Over ssh
OpenSSH provides tools to securely do remote login, remote execution, and remote file copy over network . It also supports encryption keys so that you can use it on remote machisne wiht out entering passwords repeatedly.
tar can be used along with ssh so that you can create backups on/of remote machines quickly.
The following examples show how this can be achieved.
Create a back up directory and change to it.
$ mkdir backup ; cd backup
Use ssh and tar to copy files.
$ ssh fermi@ serverip ‘tar cf - myfile*’ | tar xvf -
fermi@serverip password: ******
myfile1
myfile2
The above command will copy all files beginning with myfile from the home
directory of fermi on serverip and placed in the current directory. Note that the left
side of the pipe creates the archive and the right side expands the files from the archive
to the current directory. (Be careful. ssh can overwrite files in the current directory with out asking you.)
On the otherhand if you want to copy files from the local system to the remote system, run a local tar command first. This time, however, we add a cd command to put the files in the
directory of our choice on the remote machine:
$ tar cf - myfile* | ssh fermi@serverip ‘cd /home/fermi/myfolder; tar xvf - ’
fermi@serverip password: ******
myfile1
myfile2
Now let us try to make tgz files at the recieveing end by compressing the tar archive.
$ ssh fermi@serverip ‘tar czf - myfile*’ | cat > myfiles.tgz
$ tar cvzf - myfile* | ssh fermi@serverip ‘cat > myfiles.tgz’
( Put the ip address of the server at all places where serverip is shown.)
Sunday, July 12, 2009
Searching man pages with apropos and whatis
I had made an earlier post on reading man pages. In this post we will look at apropos utility with which you can search the man pages of any Linux command for keywords. There is a description section associated with each man page . The apropos command searches the description section for a given keyword. Keywords can be a regular expression or wild-cards , or match the exact keyword.
As an example try
All similar man page entries are shown. This can be very useful when you search for a particular command or man page.
Now try
Another utility that can be used for searching man pages is 'whatis'
The relevant man page section is also shown as the second parameter Aon each of the result line. It is also suggested to try the following for getting more ideas /flags on apropos
$ man apropos
$ apropos apropos
$ man whatis
$ whatis aprops
$ apropos whatis
As an example try
$apropos passwd
chgpasswd (8) - update group passwords in batch mode
chpasswd (8) - update passwords in batch mode
fgetpwent_r (3) - get passwd file entry reentrantly
getpwent_r (3) - get passwd file entry reentrantly
gpasswd (1) - administer the /etc/group and /etc/gshadow files
htpasswd (1) - manipulate HTTP-server password files
htpasswd.apache2-utils (1) - Manage user files for basic authentication
lppasswd (1) - add, change, or delete digest passwords.
mkpasswd (1) - Overfeatured front end to crypt(3)
mksmbpasswd (8) - formats a /etc/passwd entry for a smbpasswd file
pam_localuser (8) - require users to be listed in /etc/passwd
passwd (1) - change user password
passwd (1ssl) - compute password hashes
passwd (5) - the password file
passwd2des (3) - RFS password encryption
smbpasswd (5) - The Samba encrypted password file
smbpasswd (8) - change a user's SMB password
SSL_CTX_set_default_passwd_cb (3ssl) - set passwd callback for encrypted PEM ...
SSL_CTX_set_default_passwd_cb_userdata (3ssl) - set passwd callback for encry...
update-passwd (8) - safely update /etc/passwd, /etc/shadow and /etc/group
All similar man page entries are shown. This can be very useful when you search for a particular command or man page.
Now try
$ apropos pass*
bluetooth-applet (1) - GNOME applet for prompting the user for a Bluetooth pa...
chage (1) - change user password expiry information
checkPasswdAccess (3) - query the SELinux policy database in the kernel.
chgpasswd (8) - update group passwords in batch mode
chpasswd (8) - update passwords in batch mode
cpgr (8) - copy with locking the given file to the password or gr...
cppw (8) - copy with locking the given file to the password or gr...
crypt (3) - password and data encryption
crypt_r (3) - password and data encryption
des_read_2passwords (3ssl) - Compatibility user interface functions
des_read_password (3ssl) - Compatibility user interface functions
ecryptfs-add-passphrase (1) - add an eCryptfs mount passphrase to the kernel ...
ecryptfs-insert-wrapped-passphrase-in... (1) - unwrap a wrapped passphrase fr...
ecryptfs-rewrap-passphrase (1) - unwrap an eCryptfs wrapped passphrase, rewra...
ecryptfs-unwrap-passphrase (1) - unwrap an eCryptfs mount passphrase from file.
ecryptfs-wrap-passphrase (1) - wrap an eCryptfs mount passphrase.
endpwent (3) - get password file entry
endspent (3) - get shadow password file entry
EVP_BytesToKey (3ssl) - password based encryption routine
expiry (1) - check and enforce password expiration policy
fgetpwent (3) - get password file entry
fgetpwent_r (3) - get passwd file entry reentrantly
fgetspent (3) - get shadow password file entry
fgetspent_r (3) - get shadow password file entry
getpass (3) - get a password
getpw (3) - Re-construct password line entry
getpwent (3) - get password file entry
getpwent_r (3) - get passwd file entry reentrantly
getpwnam (3) - get password file entry
Another utility that can be used for searching man pages is 'whatis'
$ whatis passwd
passwd (1) - change user password
passwd (1ssl) - compute password hashes
passwd (5) - the password file
The relevant man page section is also shown as the second parameter Aon each of the result line. It is also suggested to try the following for getting more ideas /flags on apropos
$ man apropos
$ apropos apropos
$ man whatis
$ whatis aprops
$ apropos whatis
Friday, July 10, 2009
Rebuilding a deb package from an installation
If you have an ubuntu/debian system , you can rebuild the deb file of any installed package. For this install the dpkg-repack package.
# apt-get install dpkg-repack
Suppose you have aspell installed on you system . Rebuild the package as below.
# dpkg-repack aspell
Now look at your current directory. You will see
aspell_0.60.6-1_i386.deb
dpkg-repack will work only as root.
# apt-get install dpkg-repack
Suppose you have aspell installed on you system . Rebuild the package as below.
# dpkg-repack aspell
Now look at your current directory. You will see
aspell_0.60.6-1_i386.deb
dpkg-repack will work only as root.
Thursday, July 9, 2009
dpkg tricks for Ubuntu / debian
In Debian GNU/Linux and its derivatives such as Ubuntu the software packages are bundled in a special format. We generally call them deb packages. A .deb package is basically
an archive of files that you want to install to your computer, plus some header and control
information that identifies the software. The deb files can be manipulated with dpkg command. Here are some common dpkg tricks that you can use in every day life on the Ubuntu/Debian systems.
Let us first get a debian package from Internet. I am using Ubuntu 9.04 for this tutorial and will be using aspell as a demo package. Download aspell from the Jaunty repository.
Installing a package manually.
# dpkg -i aspell_0.60.6-1_i386.deb
Removing the package
# dpkg -r aspell
#dpkg -P aspell ( Removes everything including config files.)
Now Let us explore the contents of a deb package.
Make a temporary directory.
#mkdir aspell_tmp
Extract the deb to the aspell_tmp directory.
# dpkg -x aspell_0.60.6-1_i386.deb aspell_tmp
You can see the package contents.
( Try ls -lR aspell_tmp)
The control information alone can be extrcted using -e flag instead of -x.
Or you can list the contents of a deb package as below.
# dpkg -c aspell_0.60.6-1_i386.deb
You can get details about the package with
#dpkg -p aspell
#dpkg -s aspell
If you find a strange file on your system you can check if it belongs to any package. Let us check the file /usr/share/man/man1/aspell.1.gz ( man page of aspell)
$ dpkg -S /usr/share/man/man1/aspell.1.gz
aspell: /usr/share/man/man1/aspell.1.gz
To see the installed files belonging to aspell try this
# dpkg -L aspell
If the package is not removed completely, you may see some configuration files left over.
Tuesday, July 7, 2009
File Attributes on ext3 file system
Files and directories in Linux file systems have read, write and execute permissions
associated with user, group, and others. However, there are also other attributes that
can be attached to files and directories that are specific to certain file system types.
For example, most of the present day distributions use the ext3 file system. In ext3 we can set other attributes to files and directories. Let us have a quick look. Run the following command in a terminal.
$ lsattr
------------------- ./Videos
------------------- ./apt.html
------------------- ./screenshot.bmp
------------------- ./Music
------------------- ./Documents
------------------- ./Pictures
------------------- ./examples.desktop
------------------- ./Templates
See the output . The dashes against each file directory represent the various attributes that can be set.
The ext3 has 13 such attributes. They are
a (append only)
c (compressed)
d (no dump),
i (immutable),
j (data journalling),
s (secure deletion), t (no tail-merging),
u (undeletable),
A (no atime updates),
D (synchronous directory updates),
S (synchronous updates), and
T (top of directory hierarchy).
These attributes can be manipulated with chattr command.
Here are some examples:
$ sudo chattr +i screenshot.bmp
$ sudo chattr +A -R examples.desktop
$ lsattr screenshot.bmp
----i-------- screenshot.bmp
As shown in the preceding example, with the +i option set, the screenshot.bmp file
becomes immutable, meaning that it can’t be deleted, renamed, or changed, or have a
link created to it. Here, this prevents any arbitrary changes to the file. (Not even the
root user can change the file until the i attribute is gone.) You can use this to help
protect system files.
To remove an attribute with chatter, use the minus sign (-). For example:
$ sudo chattr -i screenshot.bmp
The man pages of chattr has additional info on various attributes.
Sunday, July 5, 2009
Learning (from) bash history
The Bourne Again Shell (bash) is the default shell in almost all Linux distributions. The bash shell has a history feature which can make life easier for any serious Linux user.
Open a shell and try the following .
$echo $HISTFILE $HISTSIZE $HISTFILESIZE
/home/fermi/.bash_history 500 500
The HISTFILE environment variable points to the name of the file where bash history is stored. When bash exits, history in memory is written back to the .bash_history file. The number of commands held in history during a bash session is set by $HISTSIZE, while the number of commands actually stored in the history file is set by $HISTFILESIZE.
You can use history command to list the entire command line history.
$history
You can list the last n entries in the history as below. (n=5)
$history 5
424 man fc
425 echo $HISTFILE $HISTSIZE $HISTFILESIZE
426 history
427 history 10
428 history 5
You can use up arrow and down arrow keys to move around the history buffer.Once a command is displayed, you can use the keyboard to edit the current command like any other command: left arrow, right arrow, Delete, Backspace, and so on.
There are some other tricks you can use .
~$ !! run the previous command
~$ !427 run command numbered 427 from history
~$ !423 *.jpg append *.jpg to command 423
~$ !ls run previous command starting with ls
You can search command history for a specific string by pressing Crtl together with r
$ <Ctrl+r> ( You will not see this)
reverse-i-search)`':
You can type in the string to be searched after the colon and press enter.
You can press Ctrl+r repeatedly to search backwards through your history list for a specific occurrence of the string.
There is another way of editing the history using fc command. Try this
$fc -e vim 427
This will open command 427 in vim and you can edit it and save it back to history. RTFM fc for details.
Saturday, July 4, 2009
Watching movies with smplayer
The mplayer project is one of the best movie players for both windows and linux. Mplayer is basically a console based player. There are several projects on the internet providing GUI front ends to mplayer.
smplayer is one of the best front ends that you can download. Both source and binary releases of smplayer are available on sourceforge.
For installation on ubuntu 9.04 you can try the following steps. The mplayer bundled with jaunty is slightly outdated. You can update mplayer to a more recent version and install smplayer front end following the steps below.
Step 1
Add the following lines to /etc/sources.list
deb http://ppa.launchpad.net/awn-testing/ubuntu jaunty main
deb http://ppa.launchpad.net/rvm/mplayer/ubuntu jaunty main
Step 2
Open a terminal and add the apt key of the PPA
sudo apt-key adv --keyserver keyserver.ubuntu.com --recv-keys 12345678
sudo apt-key adv --recv-keys --keyserver keyserver.ubuntu. com 03E02400
Step 3
Update
sudo apt-get update
Step 4
Install and enjoy.
sudo apt-get install mplayer
sudo apt-get install smplayer
A windows version of smplayer is also available on the website.
Installing midori on ubuntu Jaunty
Midori is a light weight browser developed as a part of Xface desktop environment. You can download the source code of midori from here. It uses webkit rendering engine and gtk2. This how to will show the installation of midori on Ubuntu 9.04 .
Step 1
Add the follwoing repositories to /etc/sources.list
deb http://ppa.launchpad.net/webkit-team/ppa/ubuntu jaunty main
deb http://ppa.launchpad.net/midori/ppa/ubuntu jaunty main
Step 2
Import the keys of the above PPAs
sudo apt-key adv --keyserver keyserver.ubuntu.com --recv-keys 2D9A3C5B
sudo apt-key adv --keyserver keyserver.ubuntu.com --recv-keys A69241F1
Step 3
Update the apt database
sudo apt-get update
Step 4
Install midori
sudo apt-get install midori
Enjoy the browser. Don't forget to report bugs as the software is under heavy development.
Subscribe to:
Posts (Atom)