The gtk orphan package present in the repositories of ubuntu can be conveniently used to clean up your system. It allows you to graphically select and remove packages that are no longer used.
On Ubuntu 9.10.Install gtkorphan as below.
$sudo apt-get install gtkorphan
A new menu entry will show up as System-Administration->Remove Orphaned packages.
Click on it.I got the following screen
Select the orphaned package you want to remove and click ok.
Tuesday, January 12, 2010
Sunday, January 10, 2010
Openshot video editor on Ubuntu 9.10
Open shot is a non linear video editor for linux built around python , GTK and MLT frame work. Open shot 1.0 was recently released. This tutorial explains how to install it on Ubuntu 9.10.
On your Ubuntu computer, open System > Administration > Software Sources. .
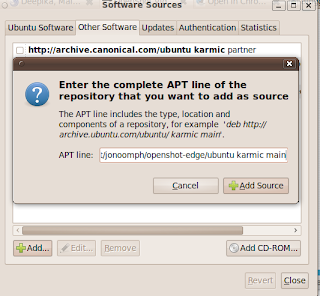
Click the Other Software tab and then Click the Add button.
Type in the following line and Click on add source button.

When prompted, reload the software sources information. You may see a warning about unverified software sources; we're going to fix that next.
Open your terminal and enter the following commands.
The above command will import the apt key .
Next update the software sources
$ sudo apt-get install openshot

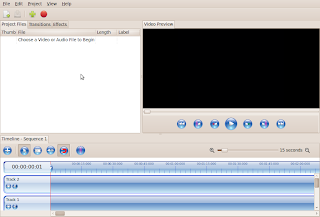
You can try editing a video.

On your Ubuntu computer, open System > Administration > Software Sources. .
Click the Other Software tab and then Click the Add button.
Type in the following line and Click on add source button.
deb http://ppa.launchpad.net/jonoomph/openshot-edge/ubuntu karmic main
When prompted, reload the software sources information. You may see a warning about unverified software sources; we're going to fix that next.
Open your terminal and enter the following commands.
$ sudo apt-key adv --keyserver keyserver.ubuntu.com --recv-keysEDFBD1F9
The above command will import the apt key .
Next update the software sources
$ sudo apt-get update$ sudo apt-get install openshot
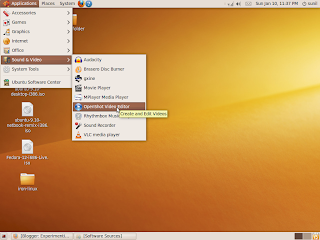
Openshot will show up at Applications->Sound and Video->Openshot.

You can try editing a video.

Friday, January 8, 2010
Google Chrome and SRWare Iron
The chrome browser from google is a fantastic product. It is fast , reliable and multi platform. However, privacy advocates are concerned about some data that chrome sends to google while we are browsing. SRware, a German company has recently released a recompiled version of chrome named Iron to address the privacy concerns. The important differences between iron and chrome are listed here.
You can try out Iron on Ubuntu. Click here for down loading the tar.gz file.
Unzip the file like this.
$ tar -xzvf iron-linux.tar.gz
The file will be unzipped to a folder name iron-linux . You can click on the iron binary inside this folder to launch iron. Or you can add the folder to the PATH environment variable and launch iron from the command line.
Wednesday, January 6, 2010
Setting up an ad-hoc wireless network between 2 Ubuntu machines
You can create an ad-hoc wireless network between 2 linux hosts as shown below. Let us assume that we have two machine A and B both running ubuntu. We will assign 192.168.1.1 to A and 192.168.1.2 to B. I am also assuming that the drivers for the wireless card ( wlan0 here) are loaded already.
Run the following commands:
On machine A.
On machine B
Please note that essid and key must be same on both machines. You can change the given values.
Run the following commands:
On machine A.
 ifconfig wlan0 down

iwconfig  wlan0 channel 4

iwconfig  wlan0 mode ad-hoc

iwconfig  wlan0 essid 'fermilevel'

iwconfig  wlan0 key 1234567890

ifconfig  wlan0 192.168.1.1
 ifconfig wlan0 down

iwconfig  wlan0 channel 4

iwconfig  wlan0 mode ad-hoc

iwconfig  wlan0 essid 'fermilevel'

iwconfig  wlan0 key 1234567890

ifconfig  wlan0 192.168.1.2
Monday, January 4, 2010
Command Aliases in Terminal
All most all unix/linux shells support a feature called aliasing. Using this feature you can shorten a complicated command with several options to a handy one.
For example open a terminal and type in the following.$ alias l='ls -l'
 Now typing l at the $ prompt will execute the  command ls -l .

Similarly you can alias any  command.

If you want the  alias to persist across reboots, add them to .bashrc
Copying Remote Files with scp
If you have ssh server running on a machine ,you can transfer files to/from it to any other machine connected over a network to it. The open-ssh server suite provides a utility named scp. Here are some examples of useful scp usage
Copy myfile to server
( ubg is my username on server1. You can replace server1 with an IP address or domain name. If the user names on the local machine and the remote server are the same you can omit it. See examples below.)
$ scp myfile ubg@server1:/tmp/
Password: ******
Copy remote myfile to local working dir
$ scp server1:/tmp/myfile /home/ubg/myfile
Password: ******
Use the -p option to preserve permissions and timestamps on the copied files:
$ scp -p myfile server1:/tmp/
If the SSH service is configured to listen on a port other than the default port 22, use
-P to indicate that port on the scp command line:
$ scp -P 12345 myfile server1:/tmp/
To do recursive copies, from a particular point in the remote file system, use the
-r option:
$ scp -r mydir ubg@server1:/tmp/
The above command will copy all mydir to remote /tmp
Sunday, January 3, 2010
Quick package install wth apt
On ubuntu , you can install a package quickly using apt as shown below.
Let us install mutt , the email client. The package name of mutt in the ubuntu repository is "mutt". ( You have to find out the package name somehow)
Press ALT+F2
The following pop will come.
Type apt:mutt in the window as shown.
Click on run.
The following pop up will come. You can press install and the rest of the procedure is same as package install from synaptic.
Subscribe to:
Comments (Atom)


