sudo add-apt-repository "deb http://archive.canonical.com/ lucid partner"
sudo apt-get update
sudo apt-get install sun-java6-jre
Saturday, May 29, 2010
sun java 6 on lucid lynx
To install sun-java6-jre on Ubuntu 10.04 LTS, type the commands below in Terminal:


Thursday, May 27, 2010
Installing Skype on ubuntu 10.04
Since ubuntu 10.04 Skype is part of the Canonical partner repository . Hence you can to install Skype easily.
To install Skype in Ubuntu 10.04 Lucid Lynx from the partner repository, go to System > Administration > Software Sources and on the "Other software" tab, enable (check the box next to it) the "http://archive.canonical.com/ubuntu lucid partner" repository.
Now open a terminal and type
Now open a terminal and type
$ sudo aptitude update && sudo aptitude install skype
Enjoy skype
Friday, May 7, 2010
How to protect a password file in linux
A simple way to encrypt a file with a password is to use gpg (GnuPG). Suppose we have a file mysamplefile.txt, to encrypt it type the following on console.
$ gpg -c mysamplefile.txt
You will be asked to enter a paraphrase twice
A new file named mysamplefile.txt.gpg will be created.
To decrypt the file type
$ gpg mysamplefile.txt
Again it will ask the paraphrase and decrypt the file.
$ gpg -c mysamplefile.txt
You will be asked to enter a paraphrase twice
A new file named mysamplefile.txt.gpg will be created.
To decrypt the file type
$ gpg mysamplefile.txt
Again it will ask the paraphrase and decrypt the file.
Thursday, May 6, 2010
Window control buttons on Ubuntu 10.04
The window control button layout on new ubuntu 10.04 is very confusing to me. I just wanted to shift them to the right as shown below.
 The easiest way is to download and install ubuntu tweaks from here. When installed ubuntu tweaks shows up under Applications ->System tools -> Ubuntu Tweaks. Launch it and select window manager setting on the left panel.

You can rearrange the control button and title bar by dragging them to appropriate positions as shown below.


You can rearrange the control button and title bar by dragging them to appropriate positions as shown below.

Some great software you miss on Ubuntu 10.04
Here is a list of software you must install to make your life easier on Ubuntu 10.04
VLC
Thunderbird,
Geany,
gPodder,
Deluge,
Banshee,
Gnome-Do,
x-chat,
wine,
virtualbox,
ubuntu-tweak,
imagemagick,
filezilla,
clamtk,
GIMP
VLC
Thunderbird,
Geany,
gPodder,
Deluge,
Banshee,
Gnome-Do,
x-chat,
wine,
virtualbox,
ubuntu-tweak,
imagemagick,
filezilla,
clamtk,
GIMP
Play back DVDs on Ubuntu Lucid Lynx
It is pretty simple
$ sudo apt-get install ubuntu-restricted-extras
$ sudo /usr/share/doc/libdvdread4/install-css.sh
Done
$ sudo apt-get install ubuntu-restricted-extras
$ sudo /usr/share/doc/libdvdread4/install-css.sh
Done
Managing archives with UNP
Install unp and forget about all worries about archives.
$ sudo apt-get install unp
Extract any archive with
$ unp archive_file
where "archive_file" can be a rar, zip, tar.gz, deb,
tar.gz2, rpm or any other archive.
$ sudo apt-get install unp
Extract any archive with
$ unp archive_file
where "archive_file" can be a rar, zip, tar.gz, deb,
tar.gz2, rpm or any other archive.
Tuesday, May 4, 2010
Virtual box truubles on Lucid
Last night I upgraded to lucid. Every thing seemed to work smoothly. Then I tried virtual box. It failed saying that the kernel modules are not loaded. I quikly fixed the problem with
~$ sudo /etc/init.d/vboxdrv setup
Then virtual box started showing the following error message.
$ sudo modprobe -r kvm-intel
$ sudo modprobe -r kvm-amd
~$ sudo /etc/init.d/vboxdrv setup
Then virtual box started showing the following error message.
The following commands fixed it.
VirtualBox can't operate in VMX root mode. Please disable the KVM kernel extension, recompile your kernel and reboot (VERR_VMX_IN_VMX_ROOT_MODE).
$ sudo modprobe -r kvm-intel
$ sudo modprobe -r kvm-amd
Tuesday, March 23, 2010
How to start web development with XAMPP
If you are planning to learn web development using LAMP environment , and find it difficult to set up various component required, XAMPP can come to your rescue. In fact, XAMPP is a prebuilt package with following componets, Apache,MySQL, PHP and Perl.
You can download the XAMPP package from Apache Friends website. The present release is available for a variety of operating systems.
Installation
For installation on Ubuntu I downloaded the tar.gz archive from Apache Friends
I decided to install xampp into /opt . Untar the downloaded file using the following command.
Earlier, the name of XAMPP project was LAMPP . Hence a folder named LAMPP will be created under /opt with all necessary files.
Start/Stop XAMPP
You can start XAMPP using the following command from a terminal
Similarly you can stop xampp using
Look for any error messages while running the commands.
Using XAMPP to write your web application
Now open up a browser and browse http://127.0.0.1 The following screens will appear .


You can access phpmyadmin from the tools section and work with mysql.
Now you can create a folder named public_html in your home directory.
Now you can link this folder to your apache document root as below.
You can write your HTML/php code using any editor and save it under public_html folder in your home directory. You can test your code by browsing to http://127.0.0.1/yourusername. ( Replace yourusername with your actual user name).
Security issues
It is not advisable to set up XAMPP to a machine directly connected to internet. The XAMPP is designed as a beginners platform to learn LAMP. If you want to run a production system look else where for a secure installation of LAMP.
You can download the XAMPP package from Apache Friends website. The present release is available for a variety of operating systems.
Installation
For installation on Ubuntu I downloaded the tar.gz archive from Apache Friends
I decided to install xampp into /opt . Untar the downloaded file using the following command.
sudo tar -xzvf xampp-linux-1.7.3a.tar.gz -C /opt
Start/Stop XAMPP
You can start XAMPP using the following command from a terminal
sudo /opt/lampp/lampp start
sudo /opt/lampp/lampp stop
Look for any error messages while running the commands.
Using XAMPP to write your web application
Now open up a browser and browse http://127.0.0.1 The following screens will appear .


You can access phpmyadmin from the tools section and work with mysql.
Now you can create a folder named public_html in your home directory.
mkdir ~/public_html
Now you can link this folder to your apache document root as below.
sudo ln -s ~/public_html /opt/lampp/htdocs/$USER
You can write your HTML/php code using any editor and save it under public_html folder in your home directory. You can test your code by browsing to http://127.0.0.1/yourusername. ( Replace yourusername with your actual user name).
Security issues
It is not advisable to set up XAMPP to a machine directly connected to internet. The XAMPP is designed as a beginners platform to learn LAMP. If you want to run a production system look else where for a secure installation of LAMP.
Sunday, March 14, 2010
How To Create A Tune with Linux Multimedia Studio
LMMS is a free cross-platform alternative to commercial programs like FL Studio®, which allow you to produce music with your computer. This includes the creation of melodies and beats, the synthesis and mixing of sounds, and arranging of samples. You can have fun with your MIDI-keyboard and much more; all in a user-friendly and modern interface.
On ubuntu you can install
$ sudo apt-get install lmms
It shows up as Application -> Sound and video-> Linux Multimedia Studio
When you launch it , you get the following screen.

LMMS offers the following features.
If you are looking for a good tutorial on LMMS see this video.
On ubuntu you can install
$ sudo apt-get install lmms
It shows up as Application -> Sound and video-> Linux Multimedia Studio
When you launch it , you get the following screen.

LMMS offers the following features.
- Song-Editor for composing songs
- A Beat+Bassline-Editor for creating beats and basslines
- An easy-to-use Piano-Roll for editing patterns and melodies
- An FX mixer with 64 FX channels and arbitrary number of effects allow unlimited mixing possibilities
- Many powerful instrument and effect-plugins out of the box
- Full user-defined track-based automation and computer-controlled automation sources
- Compatible with many standards such as SoundFont2, VST(i), LADSPA, GUS Patches, and MIDI
- Import of MIDI and FLP (Fruityloops® Project) files
If you are looking for a good tutorial on LMMS see this video.
Friday, March 12, 2010
Play wormux on Ubuntu
Wormix is a clone of classic arcade game worm. It is under active development under a free licence. Recently, wormix project has released version 0.9.1 of this beautiful game. It is available for ubuntu on a PPA. You can try out wormix installing it from PPA.
$sudo apt-get update & & sudo apt-get install wormux
A demo of wormix can be seen on the following video.
Then update the packages and install wormix.sudo add-apt-repository ppa:wormux/ppa sudo apt-add-ppa repository: wormux / ppa
$sudo apt-get update & & sudo apt-get install wormux
A demo of wormix can be seen on the following video.
Wednesday, March 10, 2010
Two front ends for Clamav
Clamav is the most popular free anti virus program for Linux environment.( Of course it scans for widows virus) However, clam is a command line utility and you need some skills for manipulating is properly. There are several graphical front ends for clam av which can make your life easy. The most popular among them are clamtk and Klamav.
Clamtk
Clakmtk uses Perl-tk for GUI. It is available for several distributions. On ubuntu you can install it as
$ sudo apt-get install clamtk
On Karmic it showed up as virus scanner under Applications ->system tools.
On launching it , the following screen pops up
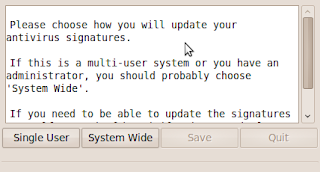
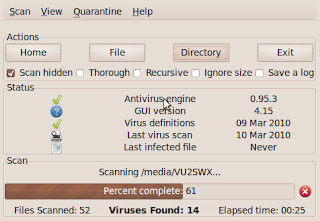
You can select for single user settings or system wide settings and then click save. The main window of clamtk will pop . You can choose either your home folder , a file or a specific directory for scanning.
When the scan is completed a list of detected viruses will be shown. You can select individual infections and right click on them to delete or quarantine.
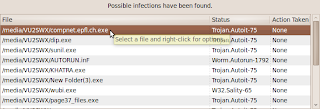
( My usb stick had nearly 100 infections. I wanted to select them all for deletion . How ever I could not find such an option.)
Klamav
Klamav is a KDE based front end to clamav. You can install it with
$ sudo apt-get install klamav
It showed up as Applications->System tools ->klamav. On launching it, I
Clamtk
Clakmtk uses Perl-tk for GUI. It is available for several distributions. On ubuntu you can install it as
$ sudo apt-get install clamtk
On Karmic it showed up as virus scanner under Applications ->system tools.
On launching it , the following screen pops up

You can select for single user settings or system wide settings and then click save. The main window of clamtk will pop . You can choose either your home folder , a file or a specific directory for scanning.

When the scan is completed a list of detected viruses will be shown. You can select individual infections and right click on them to delete or quarantine.

( My usb stick had nearly 100 infections. I wanted to select them all for deletion . How ever I could not find such an option.)
Klamav
Klamav is a KDE based front end to clamav. You can install it with
$ sudo apt-get install klamav
It showed up as Applications->System tools ->klamav. On launching it, I
Tuesday, March 9, 2010
Nautilus Image Converter
Nautilus image converter is a nautilus extension to mass resize or rotate images. if installed an additional menu entry will appear when you right click the mouse inside nautilus. It is a convenient utility which can save you lot of effort.
For installation on ubuntu. do the following.
1.) Open a Terminal
2) Type the command
$ sudo apt-get install nautilus-image-converter
3) Logout from the current session and login again.

You can rotate or resize the image as seen in the screen shots below.


For installation on ubuntu. do the following.
2) Type the command
$ sudo apt-get install nautilus-image-converter
3) Logout from the current session and login again.

You can rotate or resize the image as seen in the screen shots below.

Resizie

Rotate
Subscribe to:
Posts (Atom)