GO language promoted by google is a new system programming language said to be expressive, concurrent, garbage-collected. The language is still very young and there is no ready made package available for ubuntu. You can install it and try out the features from the version control repository of go .
Let us see how you can do this. I did it on ubuntu 9.04.
1) Install Pre-requisites on ubuntu.
You need gcc and some supporting software like bison to compile go. Install the following.
$ sudo apt-get install bison gcc libc6-dev ed.
The go repository uses mercurial version controls system . Install mercurial with the following command.
$ apt-get install mercurial
2 Set up the environment variables.
I am assuming that you are planning to install go under a folder named go in your home directory.
In my case it is /home/fermi/go
Create it with
$mkdir go
Now create another direcory inside go .
$ mkdir go/bin
The above directory will contain your go compiler. Next, you have to set u several variables.
( Note: You need not create the folder hg. You can also add the above four lines along with the PATH variable below to the .bashrc file if you are planning to use go regularly.) Update your PATH variable .
Byobu is a Japanese term for decorative screens . A Japanese byobu screen looks as below.
You can achieve similar decorative effects on your gnome terminal or xterm , or Konsole with Byobu software available from ubuntu launchpad. Infact, the new ubuntu 9.10 ships it by default. On earlier versions of ubuntu you can install byobu from the PPA here.
On my jaunty box , I added the following to /etc/sources.list and imported the key form the PPA and installed it via apt,
your terminal will immediately change to the following screen.
The bottom line on the above picture indicates the present status of your system. It displays several useful parameters. Byobu can be customised to display several other informatiin.
Infact ,byobu is an enhancement to GNU/Screen. So, all commands applicable to GNU/ screen will work with byobu. If you are not familiar with screen look at this page for some additional information
Most of the settings of byobu are stored in a hidden directory named .byobu under your home folder. Most ot these settings can be modified from byobu itself. For customising byubu, press F9 . You will get the following screen.
You can change the look and feel of your terminal as shown in the screen-shots below.
For me the status notifications on the last line is very useful For adding additional parameters Press F9 and select status notifications , you will get the following screens. Choose whatever parameter you want to display as your default status line.
To start byobu automatically when ever you launch a terminal on Karmic Koala desktop, select the last option as shown below. ( Be careful as screen sessions can become background processes. I suggest you GNU/screen documentation )
and press enter.
Now click on edit->> Profile Preferences-> Title and Command on your gnome-terminal and tick Run command as login shell.
Byobu will be launched automatically next time when you start a terminal.
Ubuntu one is a free on line file sharing service offered by Canonical. The newly released ubuntu 9.10 has Ubuntu One tightly integrated with it. For using this service , you have to sign up with Ubuntu one. Click on this link and fill in the details to get a free account which can hold upto 2 GB. A mail will come to you mail account asking you to confirm the subscription.
Once you have completed the registration and confirmed , the ubuntu one account can be set up on your karmic koala desktop.
Click on Applications >> Internet and click Ubuntu One. The following window will pop up.
You can set the preferences for show icon ,connect on start and bandwidth.
The web browser will be launched and you will be taken the the launchpad website and asked to login. Once you login you will again be asked to confirm whether you want to add you computer to Ubuntu One. Once you agree, the Ubuntu one menu item will come under . See the picture below.
You can use this folder as any other normal folder on your computer.
This folder will be under your home directory. If you open a terminal and move to ~/ Ubuntu\ One/ folder, you can see the off-line contents on your hard disk. If you open the folder in nautilus, a special connect / disconnect button appears. You can use this to connect to the Internet and update your files on the Ubuntu one servers.
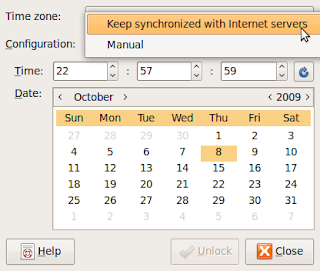
Network Time Protocol is used for synchronizing time among different computers on a network. There are several public NTP servers from which you can request current time and synchronise your machines clock the that of the server. Let us look at how this can be done on ubuntu 9.04.
Click on System->Administration-> Time and Date Click on unlock. You may have to enter your password to continue.
Select the configuration option Keep synchronized with Internet servers
You may get a dialog box informing you that NTP support has to be installed. Click on Install NTP Support . The necesary files will be downloaded from the repository. Once the download is complete Close the Time and Date pop up window. Run it once again from System->Administration-> Time and Date . You will get the following window.
Click on Select servers.
Put a tick mark on the selected server and close the window. The NTP client will start running depending on the configuration file /etc/ntp.conf. You can tweak this file for various time update options.
You can login to a remote computer via XDMCP if it is configured to allow XDMCP logins. I will explain how I did it on two Ubuntu machines running gdm. Suppose you have two machines A and B ( In my case both are running ubuntu 9.04 , you can try this on other distros too.) They are connected via Ethernet and they are on the same network. (At my end, machine A had an IP address of 10.0.2.2 and machine B had an IP address of 10.0.2.1).
At machine A.
Open a terminal and run
$ sudo gdmsetup
You will get the following screen.
Select Remote tab.
Change the style tab from remote login disabled to same as local.
Close the window.
At machine B
Boot the machine and come to login screen. Click on options and select remote login via XDMCP. Wait for a moment you will see machine A in the list.
Select Machine A from the list and click on connect button. You will get login screen of machine A. It is possible to login to remote machines on internet if you have good connectivity. You can add the host IP in the above box and connect to the remote machine to get the login screen.
The ubuntu 9.10 beta iso images for various architectures are shipped along with zsync files for easy update of iso images from previous releases. This post will show how you can use zsync to save your bandwidth and time while you download the next version of the karmic koala.
zsync is a file transfer program similar to rsync. zsync is optimized for distribution of files across Internet, with one file on a server to be distributed to thousands of down loaders.
Recently ,I used zsync to update the iso image of karmic koala alpha6 to beta . This is what I did on my ubuntu Jaunty machine.
$ sudo apt-get install zsync
I had downloaded the alpha version of karmic koala and kept it as karmic-desktop-i386.iso in my home folder. For updating this image to the beta release I typed the following command.
The above command will read karmic-desktop-i386.iso from my hard disk and compare it with the ubuntu-9.10-beta-desktop-i386.iso on the ubuntu servers and update the local image to new version.
As per the release schedule for karmic, the release candidate and final release are expected on 22nd and 29th of October 2009. Get ready with zsync for updating your beta iso to the final .
( Ubuntu provides jigdo files which can also be used to update the image)
In most of our schools and offices several websites are blocked. Most of these offices and schools are using a proxy server such as squid along with squidguard or danceguardian to achieve access restrictions on users. Most often, the sys admins forget to block internet traffic using other protocols such as ssh , ftp etc. You can beat the web filtering scheme of your network administrator if you can access a machine on internet via ssh. Open ssh server can act as a socks proxy.
So . install open ssh server on your home machine and leave it connected to internet. Note down the ipaddress of your home machine. If it uses DHCP , you can install some thing like dyndns client and keep track of the IP address. From your office/school connect to the home machine as below.
$ ssh -D 2345 ipaddress _of_home_machine
( You can use any other unused port no. instead of 2345. You may not be able to connect to home if the admin has blocked ssh port on the firewall. You can try running ssh server at home on a different port)
Open your firefox browser and select file=>preferences->advanced->network-settings. Fill in 127.0.0.1 against the Socks host column and enter 2345 as port. Click ok to save. All your webtraffic will now be tunneled to your home machine beating the local proxy. Enjoy unrestricted internet.
Google has recently released version android SDK 1.6. This tutorial will teach you how to install it on ubuntu 9.04.
1 Installing Java Android SDK is built around Java . So, you have to install Sun Java before trying to install Android. Look at this post for details about installation of sun java development kit on ubuntu 9.04.
2) Download android sdk. The current version ( 1.6 R1 ) is available as a tar.gz file from google. Look at this link . You will be prompted to accept android licence and if you accept it, you will be redirected to another link which will permit you to download the sdk. ( It is around 222MB)
3) Unzip the tar.gz file . I unzipped it to my home folder with the following command
$ tar -xzvf android-sdk-linux_x86-1.6_r1.tgz
All the files were unzipped to a folder named android-sdk-linux_x86-1.6_r1 If you look at the directory now , you will see the following files and folders.
The tools for android development is under the tools directory.
4) Test drive the android emulator
Since all the android tools are kept under android-sdk-linux_x86-1.6_r1/tools, we must modify the PATH environment variable so that it includes the above directory too.Open a terminal and execute the following. fermi @Jaunty:~$ PATH=${PATH}:~/android-sdk-linux_x86-1.6_r1/tools fermi @Jaunty:~$ export PATH You can also add the above line to your ~/.bash_profile or ~/.bashrc , so that the setting is available always.
My PATH variable looks like this after the above command.
Now you can test fire your set up . It is a good idea to keep all your android related files in a separate folder. I created a new folder named ANDR for experimenting. All the commands below are executed in that folder.
The virtual phones created by android SDK are called AVDs ( android virtual device) .Let us start the experiment with a virtual SDcard and a Virtual Phone.
Let us create a virtual SDcard $ mksdcard 2048M SDCARD If you look at the contents of the folder you will see a 2GB file named SDCARD
Next, create an android virtual phone named FERMI_PHONE.
$ android create avd -n FERMI_PHONE -t 2 Android 1.6 is a basic Android platform. Do you wish to create a custom hardware profile [no]
Press enter to choose no. You will get back the following message.
Created AVD 'FERMI_PHONE' based on Android 1.6, with the following hardware config: hw.lcd.density=160
Now start up android emulator. $ emulator @FERMI_PHONE -sdcard SDCARD
Your virtual phone pops up as below. ( Another window which asks you to participate in a survey also pops up, you can close it.)
Wait for a moment , your screen will change to the one shown below.
You can press menu button to unlock the phone.
You can flip the phone with CNTRL+F11
Now let us browse on the android phone.
5 )Starting development with SDK.
The easiest way to start development on android is via eclipse. The eclipse version shipped with jaunty is some what old. ( Version: 3.2.2-5ubuntu3) . You need a later version for installing the ADT ( android Development tools ) for eclipse. I downloaded Eclipse 3.5 (Galileo) from the eclipse site and installed it . Then completed the following steps.
Start Eclipse, then select Help > Install New Softare.
In the Available Software dialog, click Add....
In the Add Site dialog that appears, enter a name for the remote site (e.g., "Android Plugin") in the "Name" field.
In the "Location" field, enter this URL:
https://dl-ssl.google.com/android/eclipse/
Click OK.
Back in the Available Software view, you should now see "Developer Tools" added to the list. Select the checkbox next to Developer Tools, which will automatically select the nested tools Android DDMS and Android Development Tools. Click Next.
In the resulting Install Details dialog, the Android DDMS and Android Development Tools features are listed. Click Next to read and accept the license agreement and install any dependencies, then click Finish.
Restart Eclipse.
Now modify your Eclipse preferences to point to the Android SDK directory:
Select Window > Preferences... to open the Preferences panel
Select Android from the left panel.
For the SDK Location in the main panel, click Browse... and locate your downloaded SDK directory.
Click Apply, then OK.
Now your development environment is ready.
For running a hello world application, read this entry from the developers guide. Here is a screen shot of my hello world application.
cdparanoia is a command line audio CD digital audio extraction application. You can use use it for compiling music in a format suitable for your PC or mobile music player. cdrparanoia is available on almost all linux distributiions. On ubuntu you can install it with
$ sudo apt-get install cdparanoia For trying out cdpaanoia ,put an audio CD in your cd drive and run the following command from a terminal.
$ cdparanoia -vsQ ... Checking /dev/cdrom for cdrom... Checking for SCSI emulation... Checking for MMC style command set... Verifying CDDA command set... ... Table of contents (audio tracks only): track length begin copy pre ch =========================================================== 1. 18295 [04:03.70] 0 [00:00.00] no no 2 2. 16872 [03:44.72] 18295 [04:03.70] no no 2 ... 11. 17908 [03:58.58] 174587 [38:47.62] no no 2 12. 17342 [03:51.17] 192495 [42:46.45] no no 2 TOTAL 209837 [46:37.62] (audio only)
The above output show the capabilities of your CDROM , wheither CDDA is supported, SCSI emulation is used etc. Cdparanoia extracts audio from compact discs directly as data, and writes the data to a file or pipe in WAV, AIFC, AIFC or raw 16 bit linear PCM. Here are some examples of cdparanoia command lines that I use.
$ cdparanoia -B Rip tracks as WAV files by track name $ cdparanoia -B -- “3-5” Rip tracks 3-5 into separate files $ cdparanoia -- “3-7” myrip.wav Rip tracks 3-8 to one file (myrip.wav) $ cdparanoia -- “1:[40]-” Rip tracks 1 from 40 secs in to end of the CD $ cdparanoia -f -- “3” Rip track 3 and save to AIFF format $ cdparanoia -a -- “5” Rip track 5 and save to AIFC format $ cdparanoia -w -- “1” my.wav Rip track 1 and name it my.wav
Ubuntu keeps a database of all the files in the file system at /var/lib/mlocate/mlocate.db. ( how this database is kept is dictated by /etc/updatedb.conf). The locate command allows you to search that database. ( On Ubuntu, the locate command is a symbolic link to mlocate. So you can also use mlocate ) You can use locate command to find out commands, devices, man pages, data files, or anything else identified by a name in the file system. See the following example
The results come back instantly, since the database is searched and not the actual file system. Before locate was available, most Linux users ran the find command to find files in the file system. locate is case sensitive unless you use the –i option. Here’s an example: $ locate -i cpuinfo /usr/lib/python2.5/site-packages/numpy/distutils/cpuinfo.py /usr/lib/python2.5/site-packages/numpy/distutils/cpuinfo.pyc /usr/lib/python2.6/dist-packages/numpy/distutils/cpuinfo.py /usr/lib/python2.6/dist-packages/numpy/distutils/cpuinfo.pyc
The mlocate package includes a cron job that runs the updatedb command once per day to update the locate database of files. To update the locate database immediately, you can run the updatedb command manually. $ sudo updatedb
Songbird is an open source music player from the Mozilla stable. It is under active development and can be run on several platforms. Moreover, songbird offers several integrated services such as integrated music store, several fm and shoutcast station , concert tickets etc.
For trying out songbird you can get source/binary from the songbird website. If you are on ubuntu, ready to use packages are available at getdeb. For installation , grab the deb corresponding to your version of ubuntu. On my Jaunty box I did $ sudo apt-get install songbird_1.2.0-1~getdeb1_i386.deb
Song bird appeared under Application-Sound and Video->Songbird When I clicked on the menu item it showed me the songbird licence and proceeded to ask some configuration questions. Finally, I got the following screen and I started listening immediately,
You can do anything that you do in rhythmbox. Songbird Rocks !!
Some times when you install a new deb package, the system will be broken. We may have to remove the package. For this , you can try the following. ( Assuming aspell is the broken package)
# apt-get remove aspell
#dpkg -P aspell
#dpkg –force-all -r aspell
These methods can also fail some time. Your only way out will be a manual removal of packages, which can be achieved as detailed below.